On this tutorial, you will learn how to reinstall your audio drivers on Windows 10 to fix and repair any problem or drive issue on your PC.
Drivers allow you to use your device at their maximum performance like your audio, image, video, printing, etc. When some of those devices have an error, the first thing that you can try is reinstalling the drivers before trying to repair the hardware.
What is a Device Driver?
A driver or controller is a software that allows the communication between your computer and the devices connected to it. That software will allow your operating system to manage and give tasks to your devices.
That’s the reason why when you connect any device to your computer, it is required to install the proper driver to be able to use it correctly. For almost all the devices, Windows 10 has included some drivers that will installed for you quickly but in some cases, it will be needed special software to make your devices work.
When you don’t have the right driver installed for your devices, you will start experiencing issues and problems. Some easy way to fix it is reinstalling the driver that is giving you the problem.
Reasons to Reinstall Audio Drivers
Now I’m going to leave some reasons and causes why would be required to reinstall audio drivers:
- Some problem in the HDMI output
- You cant play some WAV files on your computer
- Your speakers or headphones don’t give you any output
Realtek High Definition is the name of the audio controller that you can find in Windows 10 PCs. This driver gives your sound an outstanding DTS quality besides the Dolby effect.
Thanks to these configuration settings, it is the most used controller in Windows systems but besides having a perfect performance, there are some users that have reported some wrong behaviors with this driver.
Sometimes when you update your Windows 10, you start experiencing audio and sound issues on your computer.
If you want to reinstall your audio drivers on Windows 10 quickly, you can try any of the methods that I will leave below.
Reinstall Audio Driver from Device Manager
The first method will involve the Device Manager that you can access in several ways.
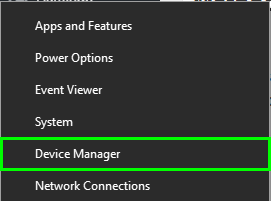
- First, you can right-click in the Start Menu to open a secret menu, there you can open the Device Manager

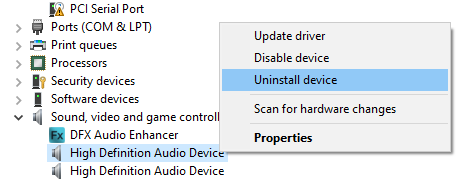
- Once opened the manager, you need to navigate and expand the section Sound, video and game controllers
- There you can see your audio driver called, in this case, High Definition Audio Device
- Rightclick on it and choose the option Uninstall device

- Now you need to confirm the uninstallation process and wait
- Restart your computer to apply the changes and then you will need to install the latest drivers.
- If you don’t have the audio drivers for your computer, I highly recommend you to use a driver updater. A program like that could help you to install the right drivers for your computer.
- You can try to use DriverBooster or DriverEasy, both are free and you won’t need to pay anything to update your drivers.
Reinstall Audio Driver from Control Panel
You can also try to reinstall the drivers from the Control Panel if you like, following these steps:
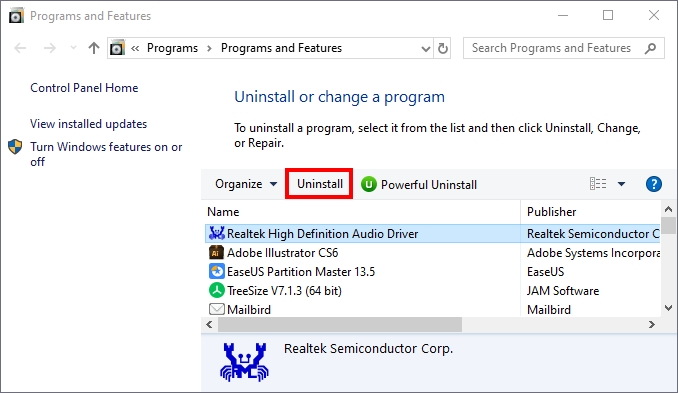
- You can try to open the Control Panel and there navigate to the Programs and Features but you can also try it from the Run dialog.
- Press the keys Win + R and copy the command
appwiz.cpl, then hit Enter to open the Programs and Features window - There you can scroll down through the programs and find the Realtek High Definition Audio Driver.

- Rightclick on this software and select the option Uninstall
- Finally, you only need to follow the wizard instructions to complete the uninstallation process
- You can also try to use the repair option if you have some issues with your audio device
Using any of those easy methods, you can reinstall and configure your audio devices and in that way, fix any problem that may be affecting your computer. I hope that this tutorial helps you to repair your audio problems.
If you have some recommendations or questions about this tutorial, let me know in the comments section.

