The error “the default gateway is not available” may appear at any time on Windows 10 computers. Generally, this error is caused by a failure in the router that gives access to the Internet, although sometimes the culprit can also be the Windows itself or a wrong configuration of the network adapter.
This problem has been reported multiple times on Windows forums, and I have faced this issue before. That’s why on this post, I want to leave some of the best tips and methods that will help you to fix the default gateway issue on Windows 10.

Method #1: Restart Router
It may seem like a piece of silly advice, but in many cases, a simple restart of the devices can solve many problems.
In doing so, all software processes are entirely closed, and in case the error was due to a temporary failure, the problem will be solved.
Turn off the router with the button on the back or, if it does not, unplug it from the power for a few seconds and plug it back in. Wait for it to connect to the Internet again and now check on the computer if the error has disappeared.
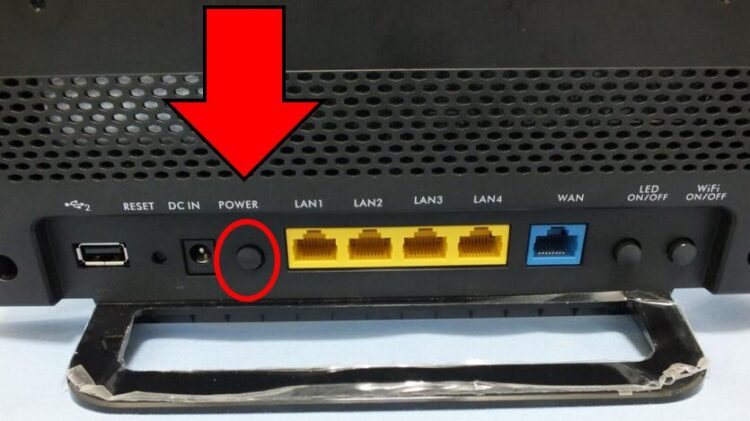
You can also try to restart your computer to fix this issue.
Method #2: Reconfigure WiFi Network
In case this problem arises when you connect to a particular WiFi network that you had previously configured on your computer, it is possible that the network configuration has changed and therefore does not work.
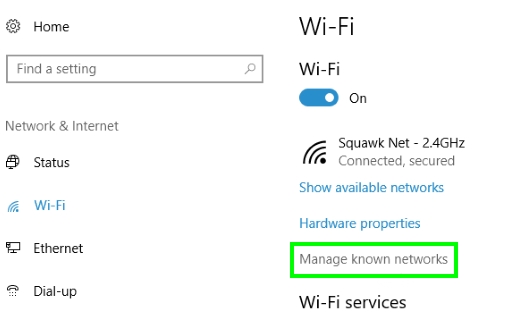
In these cases, you must forget the WiFi network of your computer and input the password again. To do this, follow these easy steps on Windows 10
- Open the Settings clicking on the cog icon from the Start Menu
- Once opened, find and click on the section Network & Internet
- Now, in the left side menu, click on the option WiFi
- On the right side, you need to click on the line Manage known networks

- In the list of networks, click on the one that is giving you problems and then on the Forget button.
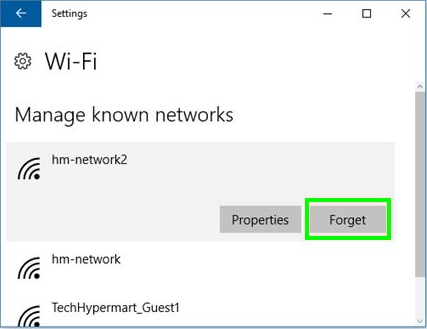
- Once this is done, your configuration will be deleted entirely from the computer, and all you have to do is connect to it again. You will need to enter the password again to access it.
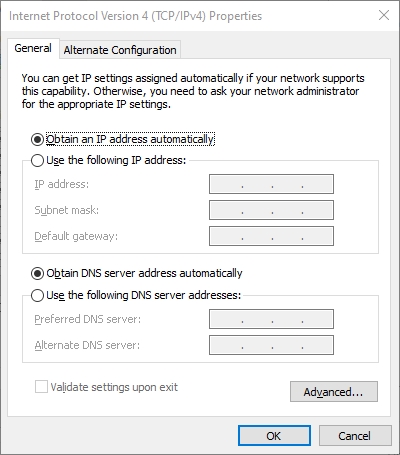
Method #3: Check the TCP/IP protocol Settings
If the above methods have not worked, you should check your computer’s TCP/IP protocol settings. The most common is that the router is responsible for assigning the IP addresses to the computers, and perhaps your device has a manual configuration for some reason.
To make sure it is set to automatic, follow these simple steps:
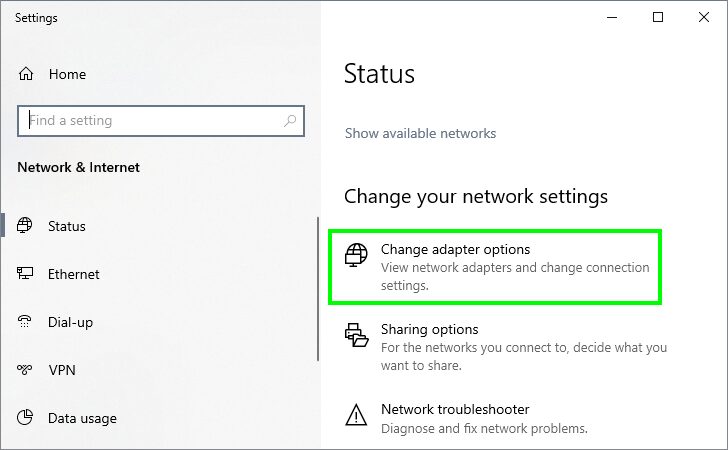
- Open the Start menu and then click on the Settings icon
- Once inside, access the Network & Internet section
- On the left side, choose Ethernet or WiFi depending on the method you are using to connect to the Internet
- Now, on the right, you need to click on the button Change adapter options
- In the new window that opens, right-click on the adapter and choose the Properties option
- A new window will appear in which you must double click on the Internet Protocol version 4 (TCP/IPv4) option.
- There, make sure that the Obtain an IP address automatically and Obtain DNS service address automatically options are active. Then click on OK to save the changes.
Method #3: Remove McAfee Software
There have been reported several issues with the McAfee programs. Also, they could be the reason why the error “the default gateway is not available” has appeared on your computer.
To fix this situation, you will need to uninstall the McAfee software from your computer, and you can do that easily from the Control Panel. Still, in some cases, the program left behind some unwanted services and processes that can be removed from the Control Panel.
For that case, you can use a particular uninstaller, and one that I recommend is iObit Uninstaller.
- You only need to download the program and install it on your computer
- Then launch iObit Uninstaller, and there you will see all the programs installed on your computer. You can search to type the words McAfee and find this software quickly.
- Once you find all the McAfee programs, click on the trash icon to start the uninstallation process
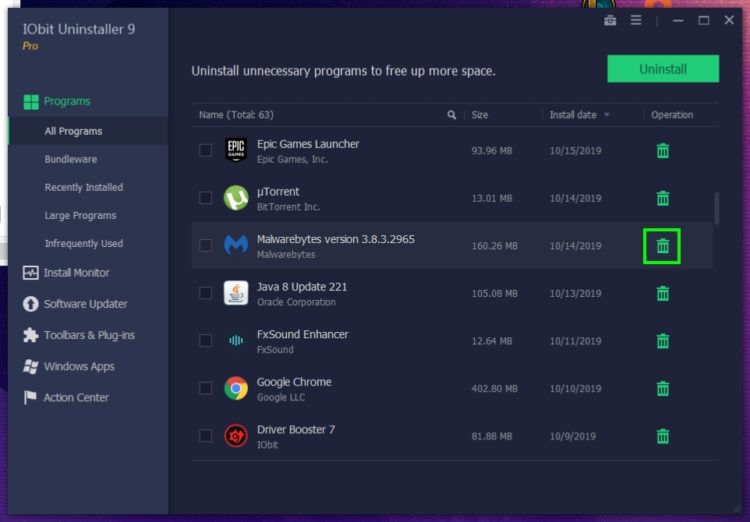
- This program will also show you some files and registry entries left behind from the software, and you can check to all those files and click on Delete
- Now restart your computer and verify if the problem has been fixed successfully
Method #4: Restart Network Adapter
If you haven’t been able to fix this default gateway issue so far., you can try another solution that is to restart the network adapter.
To do that, you need to follow these steps:
- In the right side on the taskbar, right-click on the Network icon and click on the option Open Network & Internet settings
- Once opened, scroll down and click on the button Change adapter options
- You will open the Network Connections window again, there right-click on your network adapter and choose the option Disable
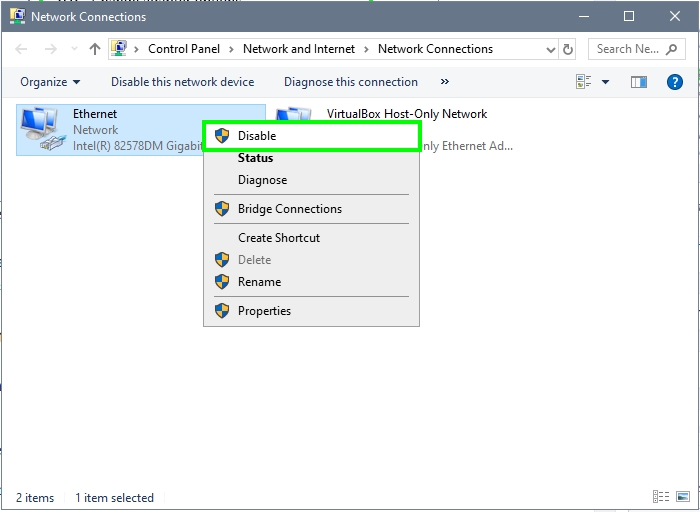
- Wait until the adapter is fully disabled and then right-click again in it and this time select the option Enable
- Wait until the adapter is enabled successfully and now try to connect to the internet. Hopefully, the default gateway issues will be fixed.
Method #5: Disable Saving Power Feature
On Windows, there is, by default, enabled some settings in your connected devices that allow you computers and laptops to save power when they are not used.
This applies more to USB WiFi adapters, and you can disable this feature following these steps:
- Rightclick on the Start Menu and select the option Device Manager
- Once there, you need to expand the section Network adapters
- There, right-click on your WiFi adapter and select Properties
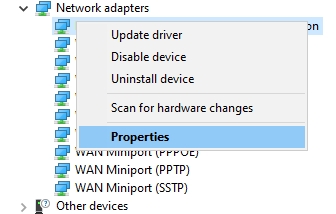
- In the window that opens, navigate to the Power Management tab and there uncheck the box Allow the computer to turn off this device to save power

- Finally, click on Apply to save the changes and close all the windows
- Now, you can test your internet connection to certify is the gateway issue has been fixed
Method #6: Enable Maximum Performance to WiFi
On Windows, by default, your WiFi adapters will be set up in the Maximum Performance setting, but in some cases, this option is set to Maximum Power Saving.
If you have issues like the default gateway is not available, you need to change this setting following these steps:
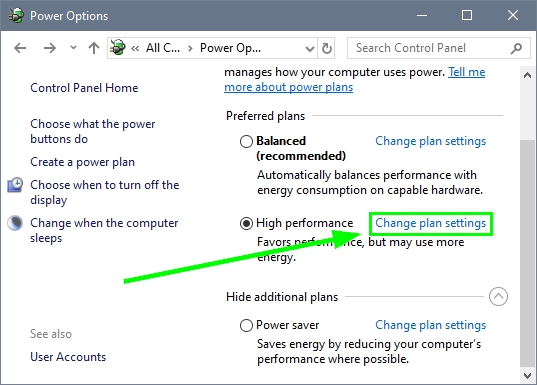
- Press the keys Win + R and type the word control, then click on OK to open the Control Panel
- There, navigate to the section Hardware and Sound and then to Power Options
- Now, under your current power plan, click on the line Change plan settings
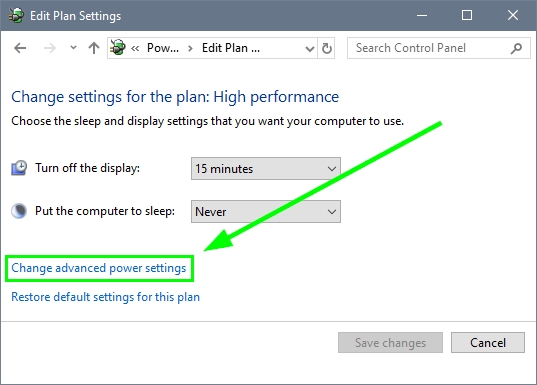
- Click on Change advanced power settings, and there you will see all the settings
- Expand the section Wireless Adapter Settings and in the Power Saving Mode, choose the option Maximum Performance
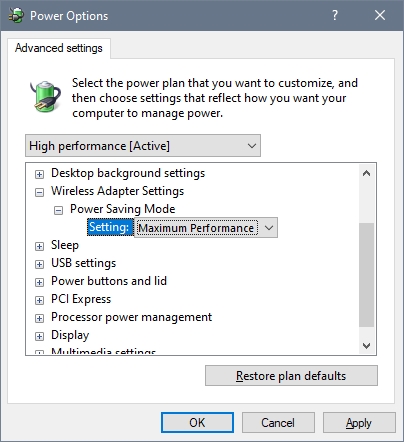
- Click on Apply to save the changes and then close all the windows
- You can try to disconnect and reconnect to your WiFi network and then check if the issue has been fixed
Method #7: Reset TCP/IP
You haven’t been able to fix the default gateway issue so far on Windows 10? Don’t panic, and there is an ultimate solution to this issue that may help you.
You can try to reset the Internet Protocols and also the default gateway from the Command Prompt easily. If you want to try that, you need to follow these simple steps:
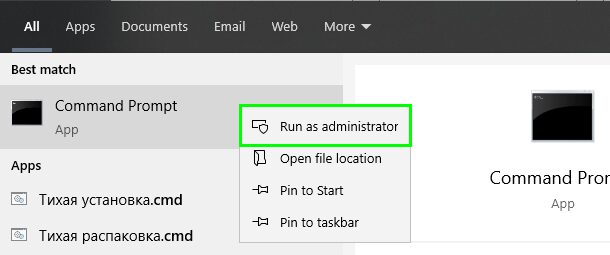
- Open the Start Menu and search the word cmd
- There, you will see the Command Prompt, so right-click on it and select in the menu Run as administrator
- Once you open the CMD, you need to copy this command:
netsh int ip reset - Press Enter to run the command, and your default gateway will be reset quickly
- Now, you can close the Command Prompt
- Finally, try to connect to your network again, and surely there wouldn’t be any problem
Wrapping Up
Those were the tips and solutions that I know that could help you to fix the default gateway issue on Windows 10. If you know about another way or need some assistance, contact me using the comment section below, I’m always active in the blog.
I will also leave you some other network-related issues that could help you with this problem: