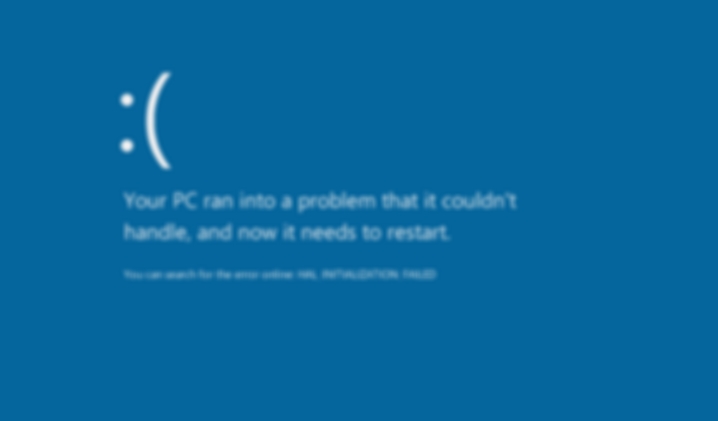
Ntkrnlmp.exe BSOD is an error code that occurs during the installation of the Microsoft Windows operating system. If your installation stops responding and freezes with this error, Windows has two theories about what could be happening.
Microsoft has identified two possible causes for the ntkrnlmp.exe error message. If the configuration of the BIOS (Basic Input Output System) of your computer is incorrect, this could cause the error during the installation of Windows. The other cause is if your installed RAM is defective.
You can check those things separately, but if the problem appears suddenly and randomly on Windows after the installation, on this post, I will leave some of the best tips and tricks that several have reported fix this ntkrnlmp.exe issue on Windows quickly.
Method #1: Reinstall Graphics Card
This is one of the first tips that users have reported works like a charm on Windows computers. Your graphics drivers could be damaged or corrupted, and that’s why you see the error on your computer.
You can reinstall your graphics in two different ways that I will show you below:
Option #1: Reinstall Graphics Card Manually
To complete this task, you will need to use the Device Manager and download the drivers from your manufacturer’s website. Follow these steps:
- Open the Start Menu and there search the word control
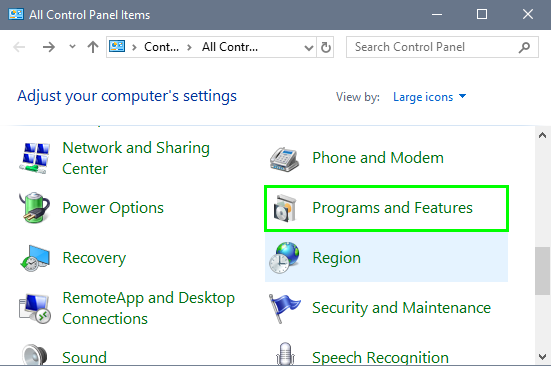
- Click on Control Panel
- Once there, navigate and click on the section Programs and Features
- There you will see a list of all your programs, there find your graphics card drivers and then click on Uninstall.
- Follow the wizard until to uninstall your graphics card and restart your computer completely
- Now, you will need to visit your manufacturer website to download the latest drivers
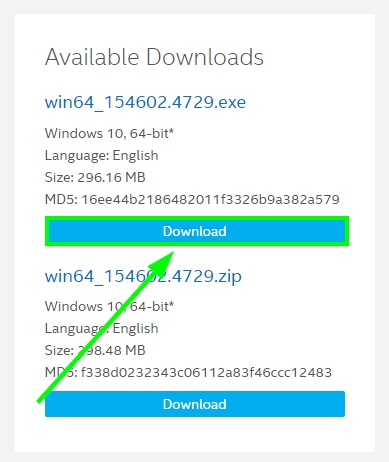
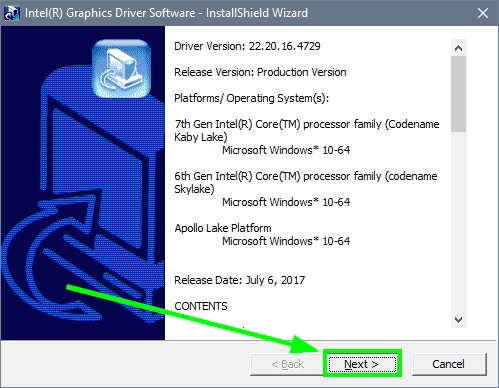
- Once downloaded the files, run the installer and follow the process
- Finally, restart your computer and verify that this ntkrnlmp.exe doesn’t appear again
Option #2: Reinstall Graphics Card Automatically
You can use another option that lets you remove the graphics cards entirely and then install the latest driver automatically. Follow these steps:
https://www.techspot.com/drivers/driver/file/information/17830/
- Click here to download Display Driver Uninstaller
- Once downloaded, unzip the folder and open the file
Display Driver Uninstaller.exe - On the window that opens, to the right, select the option GPU and then your Graphics manufacturer from the dropdown menus
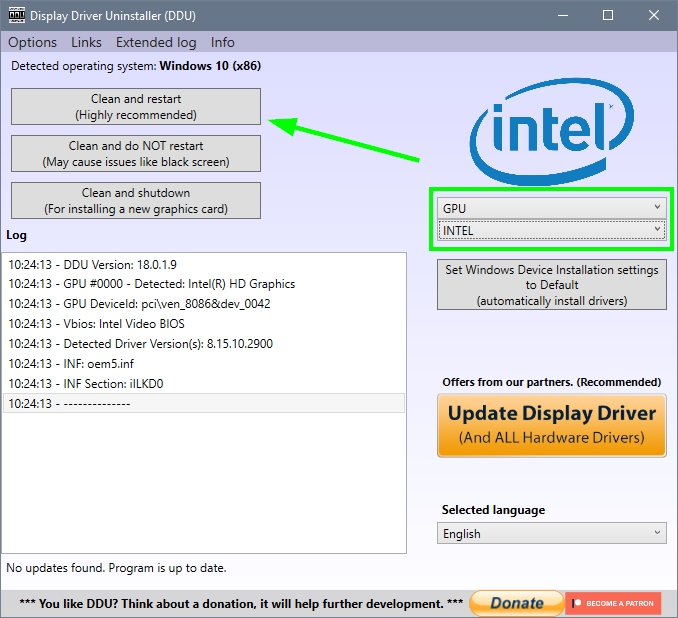
- Once done, click on the button on the left that says Clean and restart
- This utility will clean all the files of your graphics card and restart your computer
- Once restarted, click here to download Driver Booster
- Once downloaded, open the installer and follow the process, be careful when the program asks you also to install SystemCare
- When the installation finishes, click on the button SCAN
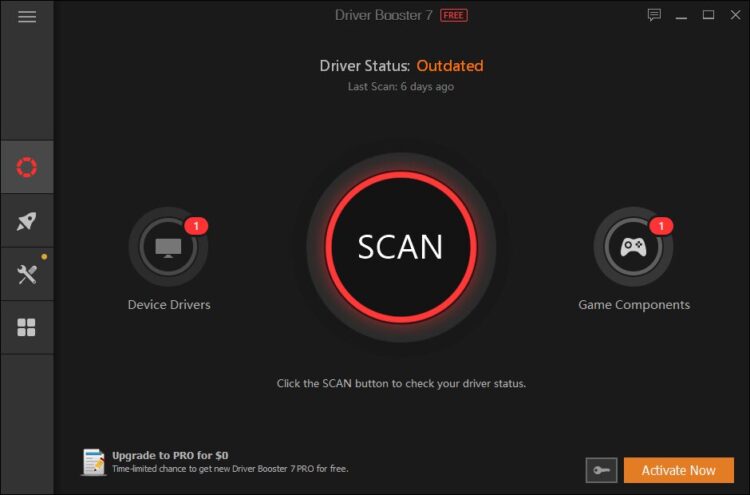
- This software will scan your graphics drivers, and when it finishes, it will show you the available update
- Click on the button Update Now and wait for the program to install the drivers and restart your computer
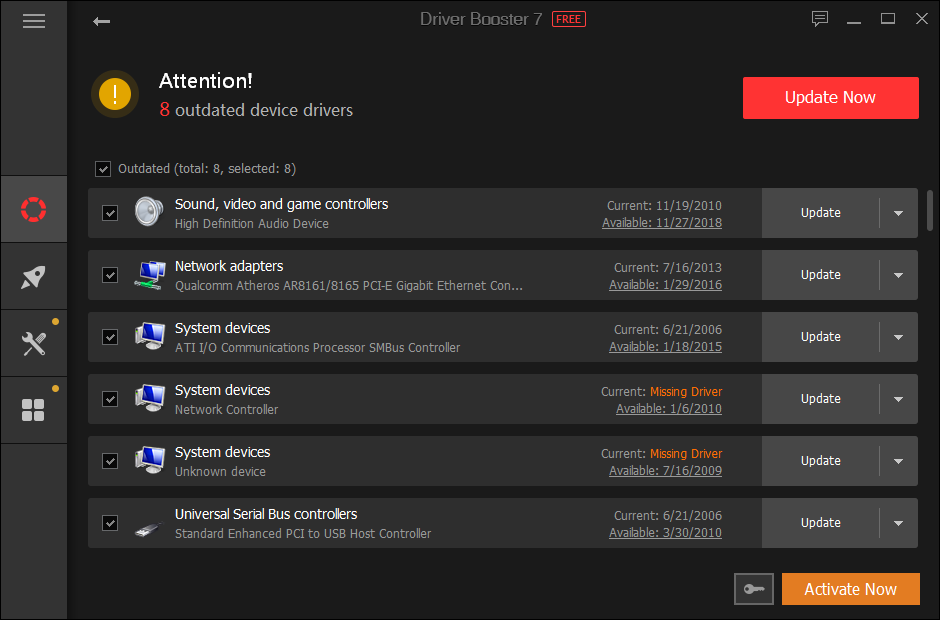
- Now, verify that the error ntkrnlmp.exe has been fixed successfully
Method #2: Disable Enhanced Intel SpeedStep Technology
SpeedStep Technology is a technology presented by Intel microprocessors to deliver very high performance while meeting the power saving features that most machines need. Conventional Intel SpeedStep technology exchanges both voltage and frequency together between high and low levels in response to processor load. Sometimes Enhanced Intel SpeedStep is abbreviated as EIST.
Some users have reported that his feature is the problem of why you see the error ntkrnlmp.exe on Windows. So, you will need to disable this feature on the BIOS, following these steps:
- Restart your computer
- While is booting press the keys F2 or F12 (depending on your motherboard) to open the BIOS Settings
- Once there, navigate to the section CPU Power Management Configuration
- There make sure to disable the option Intel EIST
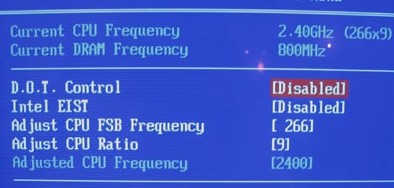
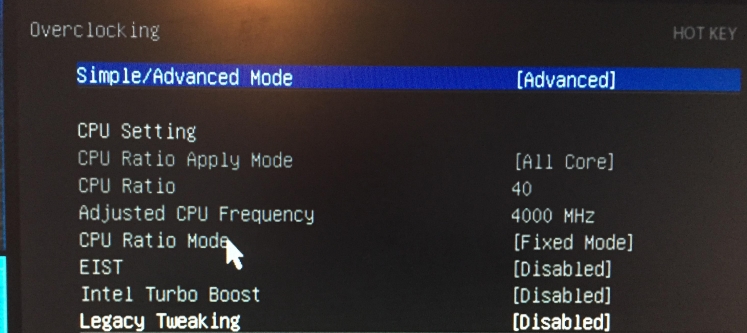
- If you have a modern motherboard, these settings could be located in the Overclocking section like this:
- Once disable the feature, restart your computer and verify that the error has been fixed
Method #3: Set Driver Verifier Manager
On Windows, you have a useful utility called Driver Verifier Manager that manages your kernel drivers and also the graphics drivers.
Setting this utility, you will ensure that your system loads appropriately and with the appropriate drivers on your graphics card.
You can configure this utility following these steps:
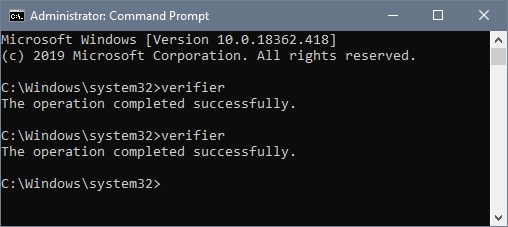
- Press the keys Win + R and in the window that opens enter the command
cmd - Now, press the keys Ctrl + Shift + Enter to open the Command Prompt
- Once in the Command Prompt, copy and run the following command:
verifier
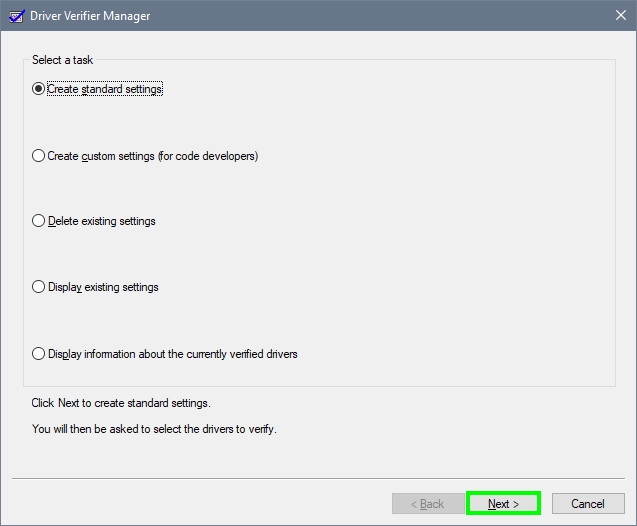
- A new window will open and there click on the option Create standard settings, then click on Next
- Now, choose the option Automatically select all drivers installed on this computer
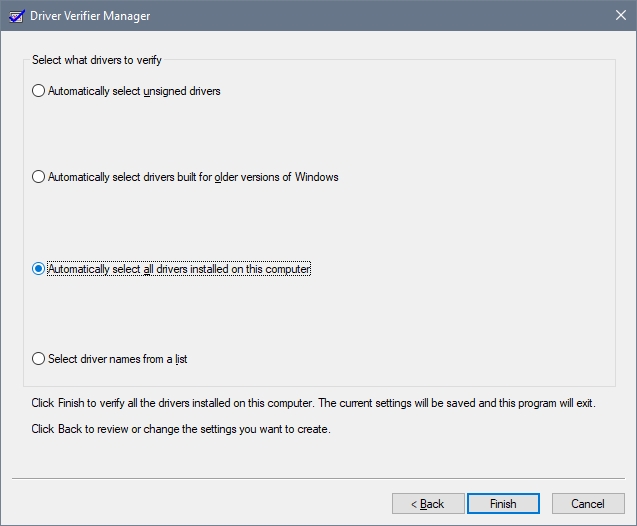
- Finally, click on Finish and restart your computer
- Hopefully, Windows will start the right drivers, and this ntkrnlmp.exe error will be gone for good
Method #4: Update Windows
Some users have reported that they successfully fix the ntkrnlmp.exe error installing the latest updates for Windows 10.
If you haven’t updated your system for a while, you may need to check for available updates following these steps:
- Open the Settings pressing the keys Win + I
- Click on the section Update & Security
- Now, click on the button that says Check for updates
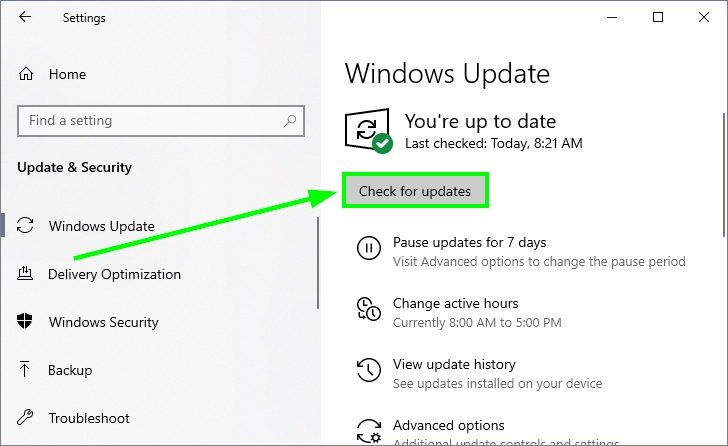
- Windows will start searching updates and then install them all
- Once finished, restart your computer and hopefully, you will no see this error anymore
Method #5: Scan for Viruses
If there something that could affect your entire system, are virus and malware software. You have to be careful when you download and install programs on your computer.
And for that task, you have the so-called Antiviruses. Surely you have one installed on your computer, and you can use it to perform a full scan of your system.
if you don’t any antivirus installed on your PC, you can use the builtin antivirus: Windows Security.
To perform a full scan on Windows Security, follow these steps:
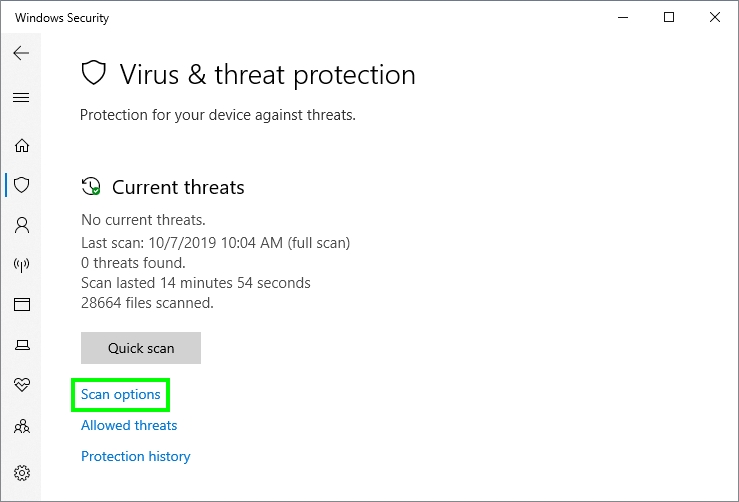
- Navigate to your taskbar on the right and double-click on the Windows Security icon

- Once there, click on Virus & threat protection
- Click on the line Scan options
- Finally there, select the option Full scan and then click on the button Scan Now
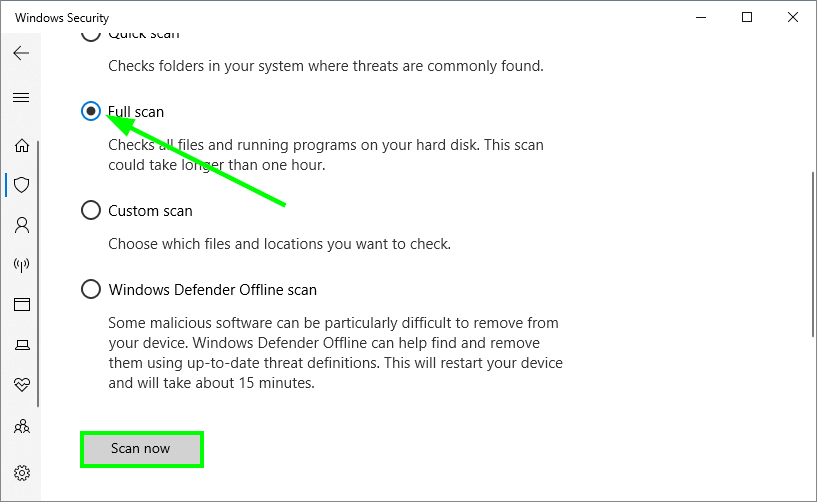
- Windows will start scanning your entire system, and this process could be a little longer. You only need to wait for the utility to finish and then restart your computer.
Method #6: System Restore
If none of the methods above help you to fix this ntkrnlmp.exe BSOD on Windows, you have one last resource: System Restore.
You can use the utility System Restore to roll back your computer to an earlier date where everything was working fine.
To use this utility, follow these steps:
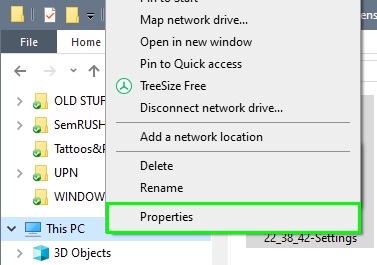
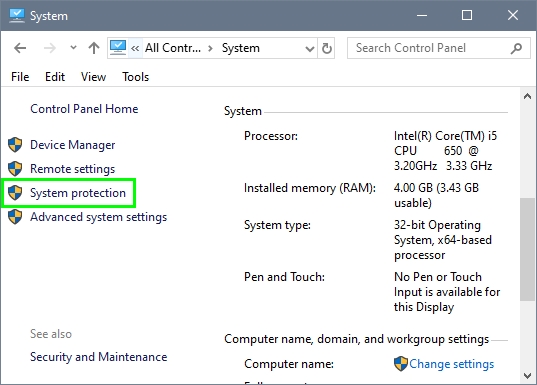
- Open the File Explorer using the keyboard shortcut Win + E
- There, right-click on the shortcut This PC and in the menu click on Properties
- Ont he window that opens, click on the line System Protection located on the left side menu
- Now, click on System Restore and then click on Next
- There you will see some earlier dates that you can select to fix this issue. Choose one and click on the Next button
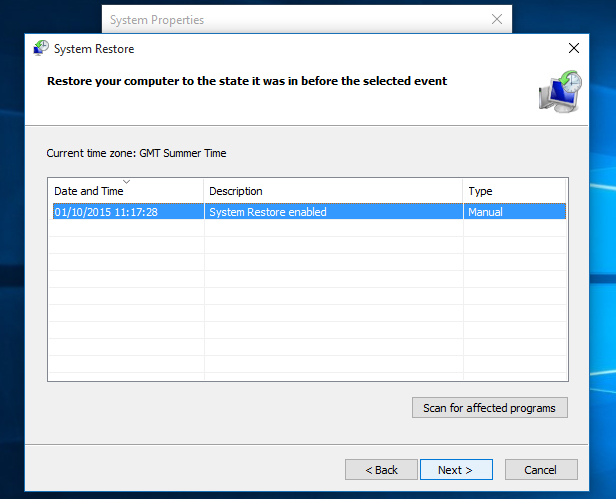
- Follow the wizard until your system is restored, and surely, the ntkrnlmp.exe BSOD will be fixed.
So far, those were the best tips and tricks that you can use on your computer to fix this issue quickly. You also can use the last resource that is reinstalling Windows 10.
If you only want to check if the problem is with some component, you can also try to disconnect some devices or even install another Windows in another drive to check if that system works.
Below, I will leave other articles that may come in handy for you: