Do you want to fix the error SVCHOST.exe high CPU usage? Check this tutorial with some natural methods and fixes for Windows 10.
Windows 10 has several processes and services that allow the applications you have installed to work appropriately. Still, on some occasions, those services cause conflicts and errors that affect the optimal performance of your computer and one of those processes that create conflicts in SVCHost.exe.
The problem is that sometimes, SVCHost.exe makes excessive use of the CPU affecting and slowing down your PC.
In this post, I want to give you several solutions to this issue to be able to fix it correctly.
What is SVCHOST.exe?
SVCHost was designed for services that need to run the dynamic libraries’ links to Windows. In other words, the SVCHost.exe process is a process that you will always find on Windows 10 because it allows the use of the libraries to any program or app.

Usually, those programs and apps don’t have the required service to work alone and that when they need to use the DLL, that is a useful option because it is code that can be reused, reducing the disk space that will take to recode the same thing.
Now, on this post, I will show you some ways that you can fix the error SVCHOST.exe high CPU usage on Windows 10.
1. Virus Scan
Although SVChost.exe is a process of Windows 10 that usually is working smoothly, in some cases, when some virus has infected you, it will start using all your CPU.
If you don’t have any third-party antivirus installed on your computer, you can the Windows 10 Antivirus. To do that, follow these steps:
- Double click in the antivirus icon located in the taskbar
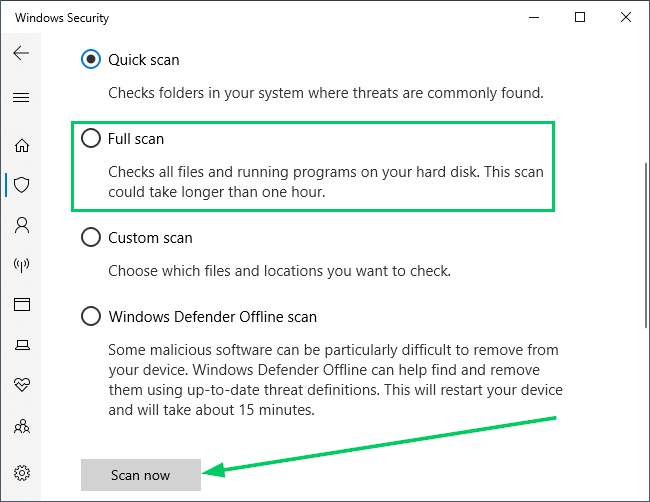
- Now open the section Virus & threat protection and there click on Scan options
- Choose full scan and then click on Start Scan
In this way, you can get rid of some virus that may be affecting your CPU usage.
2. Disable SVCHOST Services
As I have indicated, svchost is a set of processes, and some of them can harm the natural performance of the system. You can temporarily disable any of these services to rule out that they are affecting hardware performance.
For this, you will access the Task Manager, and there go to the tab Details, and there you will right-click on the process svchost.exe that is consuming CPU and select the line Go to service(s):

The following window will be displayed where you will see the highlighted services that run under the svchost.exe process. There you will right-click on the highlighted lines and select the option Stop.

This same process you will do with each process with high CPU usage. Now, click on the option: Open services located at the bottom and in the new window find the service called Windows Update, right-click on it and select the option Properties:

In the expanded pane, go to the Startup type field, and there choose Disabled. Click on Apply and OK to save the changes.
3. Empty Log Events
Windows 10 is always recording all the actions that you make on your PC, like installing or reinstalling programs, playing videogames, and even crashing issues. When these logs files get too heavy, you may be experiencing a problem with the SVCHOST.exe high CPU usage or memory. In this case, the solution is to clear the records of the Event Viewer.
For this, access the Event Viewer, you can do it pressing the key combination Winkey + R and type the command: eventvwr and press Enter.
In the Event Viewer, go to the section Windows Logs and select the line Application and empty the logs click on the line “Clear log…” on the right part of the window.

4. Delete Updates Cache
Windows Update can also be the reason why the svchost.exe process is taking too much CPU on your computer. One way to fix that is by deleting the updates cache.
To do this, access the system services using the following keys Winkey + R and type the command: services.msc and press Enter or OK.
There, locate the service Windows Update, right-click on it and select the option Stop:

Once the service is stopped, go to the path C:\Windows and there remove the SoftwareDistribution folder.
Finally, you need to restart your computer to apply the changes, and in that way, you will fix the svchost.exe high CPU usage problem on Windows 10.
Wrapping Up
So far, those were the best methods you can try to fix the error SVCHOST.exe high CPU usage on your Windows 10. Remember to be careful following the steps above.
Have you been able to fix the error on your computer? Let me know in the comments section.
Must Read: What is Wsappx? Fix High CPU & Disk Usage in Windows 10