Do you want to install your NVIDIA drivers, but a message appears in the installer that says: NVIDIA installer cannot continue? The problem occurs when you want to install the driver in Windows 10. This error has been seen when you want to install a video card of 1050, 1060, or 1080 series, and in this, I will talk about this issue and how to fix it.
For the graphics card to offer its maximum performance and all its features, it is essential to install the latest drivers. And this, in the case of NVIDIA graphics, should be as simple as downloading the installer from its official website and letting the procedure be carried out automatically. But sometimes, problems can occur with the NVIDIA graphics drivers.
Fix NVIDIA Installer Cannot Continue on Windows 10
When installing new hardware, and in this case, an NVIDIA graphics card, there may be problems in the relationship of this hardware to your computer software.
The drivers are the ones that make sure it works correctly, and Windows 10 should be able to install the latest available drivers via Windows Update, but this doesn’t always happen.
Most likely, you will install an outdated version, and then it is advisable always to use the NVIDIA installer available on its official website. But yes, there may also be an error when installing the drivers in Windows 10 that says NVIDIA installer cannot continue.
Solution 1: Update NVIDIA Drivers Manually
If you are not being to able to update your graphics cards using the NVIDIA installer, you can also try to perform this process manually from the Device Manager.
The things that you will need is the folder where you unzipped your driver files and followed these easy steps:
- On Windows 10 to open the Device Manager, you can right-click on the Start Menu
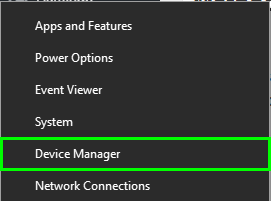
- Once in there, navigate and expand the section Display adapters
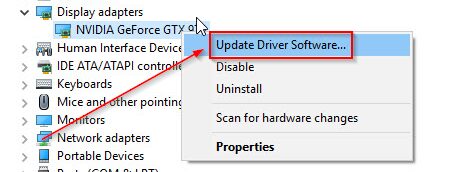
- There right-click on your graphics card and in the menu select Update Driver
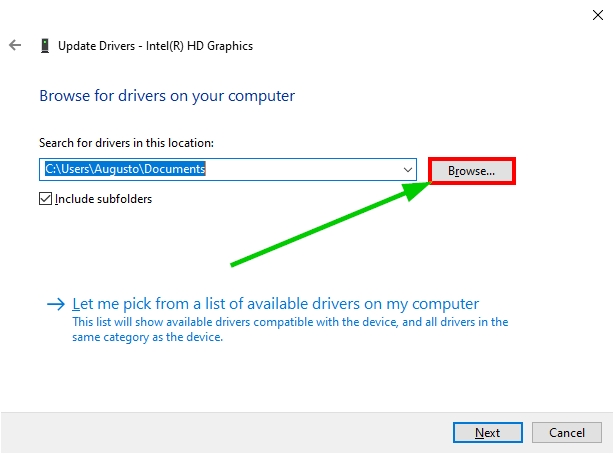
- Now, in the window that opens, you need to choose the option Browse for Drivers on my computer
- Click on the Browse folder and select the path where are located your NVIDIA drivers
- Then click on the Next button and wait until the Device Manager updates your graphics cards
- Once finished, you will need to restart your computer manually, and then your drivers will be fully updated and ready to game on.
Solution 2: Enable NVIDIA Device
If you can install your drivers using the NVIDIA installer, maybe the problem is that your graphics card isn’t enabled, and therefore, the installer could find it.
An easy way to verify that your graphics card device is enabled is from the Device Manager.
- This time we will open the Device Manager from the Run window. Press the keys Win + R and in the text box copy the command
devmgmt.msc. Now hit Enter to open the Device Manager - Navigate once again to the Display adapters section and expand it
- Rightclick on your NVIDIA graphics card and in the menu select the option Enable
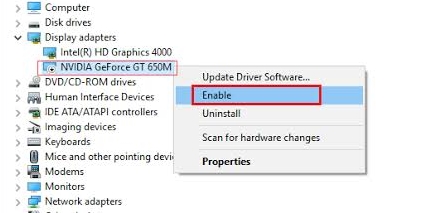
After performing this process, you need to restart your computer and then try to rerun the installer. If, after performing the installer continues to give you a problem, you can check the other solutions.
Solution 3: Kill NVIDIA Processes
Another way to let the NVIDIA installer continue with the updating process is by ending all the other NVIDIA related services and processes.
As you may know already, NVIDIA runs several processes and services on your computer to be able to provide good performance. Still, sometimes, those are the reason why the installer cannot continue. One quick way to fix this is ending those process from the Task Manager like this:
- You first need to open the Task Manager. To do that you press the keys Ctrl + Shift + Esc
- Click on the button More details, and there you will see all the processes running in the background
- Find all the ones related to NVIDIA, like NVIDIA Container or GeForce Experience and click on the button End Task
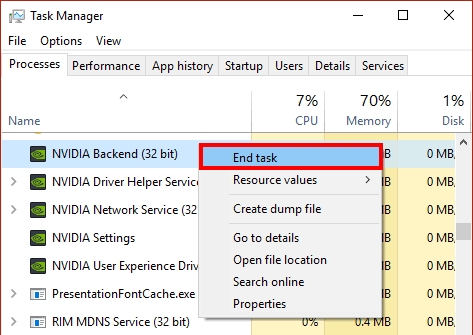
- When you finish, rerun the NVIDIA installer ad check if you can continue with the installation process normally.
Solution 4: Rename NVIDIA Folder
On NVIDIA forums, some users reported another quick way to fix this problem that had worked like a charm since this installed problem was first reported.
If you rename the NVIDIA folder located in the Program Files, the installer will try to recreate and proceed to clean install your graphics card. Hopefully, you wouldn’t see anymore the installer cannot continue issue.
- You will need to open the File Explorer using the keyboard shortcut Win + E
- Now, navigate to the C drive and there open the Program Files folder
- Located the Folder NVIDIA Corporation and right-click on it, then select the option Rename. You can also use the keyboard shortcut F2
- Rename the folder to something like NVIDIA Corporation OLD
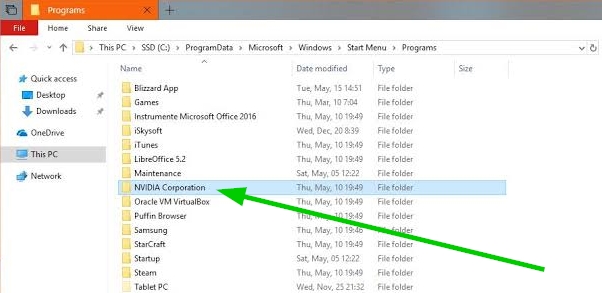
- Finally, you can try to rerun the installer and verify that now is working without problems
Solution 5: Disable Antivirus
This is another fix that you may need to consider if you have installed some third-party antivirus on your computer besides Windows Defender Security.
Maybe your antivirus is blocking some core components of the NVIDIA installer and that the reason why you see the message about the install cant continue.
An easy way to fix this is disabling your antivirus temporarily while you install the graphics card. For example, on Avast, you need to right-click in the icon located at the taskbar and click on the option Disable protection on Avast Shield Controls.
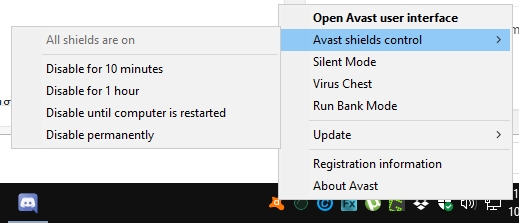
When you finished installing the drivers, make sure to enable the antivirus to protect your computer again.
Solution 6: Clean Install
If you don’t have luck fixing this problem so far, there is one ultimate solution that you can try.
Perform a clean install means you will need to remove all the NVIDIA programs, services, and processes from your computer. After that, you will install the NVIDIA drivers entirely from scratch, and hopefully, the installer will no show you any warning message.
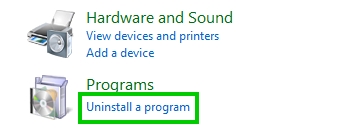
- You first will need to remove all the NVIDIA programs from the Control Panel. You can open it from the Run window Win + R, running the command
control. - Once in the Control Panel, click on the line Uninstall a program
- In this utility, you need to find all the NVIDIA related programs and click on the Uninstall button. Some of them are NVIDIA Graphics Drivers, Geforce Experience, etc.

- After you finished uninstalling all the NVIDIA programs, restart your computer
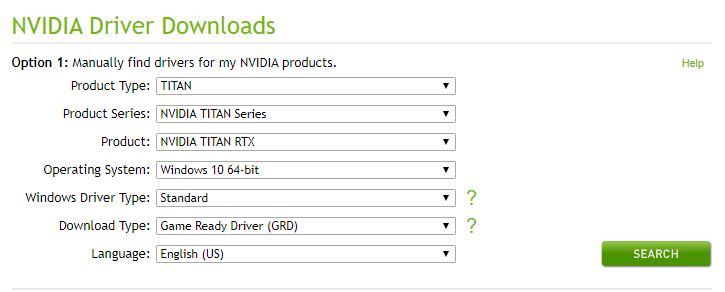
- Now you will need to download the latest drivers from the NVIDIA website.
- There you will only need to fill the details about your graphics card and click on the Search button
- Run the file that you download on your computer and hopefully the installer will be able to install your drivers without problems
Wrapping Up
When the NVIDIA installer cant install or update the drivers correctly, it sometimes means that there is something wrong with your device or also with Windows 10. This issue was reported multiple times after the Fall Creators Update, and luckily with these methods, you will able to fix the problem quickly.
If you need more help with this NVIDIA issue, you can read these other articles: