Suddenly the Google Chrome sync is not working? Don’t worry, on this post I will show you several ways to fix this error quickly.
Google Chrome is positioned as one of the most popular browsers worldwide for its versatility, simplicity, and undoubtedly, the ability to synchronize between devices.
This is something practical and useful that allows as Google Chrome users everything you do, whether on PC or mobile devices, be synchronized.
But sometimes the Chrome sync feature doesn’t work appropriately for that, on this post I will show you how to fix this error with simple methods.
How to Fix Google Chrome Sync Not Working
One of the best features that Google Chrome has is the ability to synchronize your bookmarks, history and personal information about your web browsing in the cloud, therefore, the next time you install the browser in your computer o another device, you will have all your data ready to continue your browsing.
Although this is something that comes in handy, it also exposes your privacy because Google will have all your information. Still, if you don’t mind about that issue, you can continue syncing all your devices without problems.
Usually, the Google Chrome sync should be work without problems in all your devices like your smartphone and your computer, but sometimes this doesn’t happen.
There have been reports that the Google Chrome sync is not working correctly on Windows 10 after some update or even randomly after restarting the computer.
That’s why on this post, I will leave all the troubleshooting methods that could help you to fix your Chrome synchronization quickly. Let’s begin with the first one.
Note: Make sure to follow all the steps of this tutorial and all the methods carefully to avoid any future problems in your browser. Remember that you can create a restore point quickly.
Method #1: Disable Antivirus
The main reason why you install an antivirus on your computer is that you want to avoid any threat or virus to gain access or infect your computer. Those malicious programs could harm or steal your information, but also some of your installed apps. Your antivirus will control each file and connection that try to send or receive packets.
Although this is a standard antivirus task, this could also affect the synchronization of your programs and devices on Windows because some false positives block the harmless connection.
Some way to fix Chrome sync when it is not working is disabling the antivirus temporarily while you complete the synchronization process.
If you use the Windows 10 integrated antivirus, Windows Defender, you can follow these steps:
- Click on Windows Defender Security Center icon

- Go to the Virus & threat protection section and there click on Virus & threat protection settings
- To disable Windows Defender, click on the switch in Real-time protection
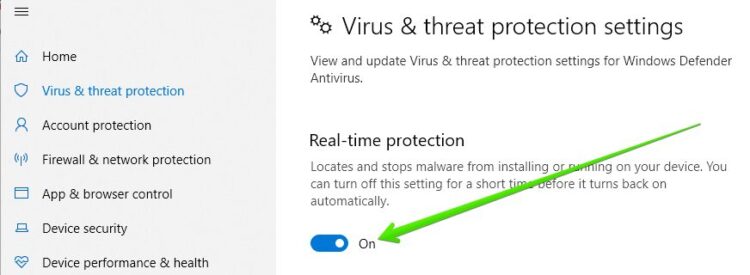
- Now, check if Sync now works.
Method #2: Verify your Google Password
Remember that Google Chrome requires a login to each device to carry out the synchronization process correctly. Still, in some specific cases, the sync error is associated with a fault in the associated password.
So, follow these steps to verify that your password login details are appropriately set up.
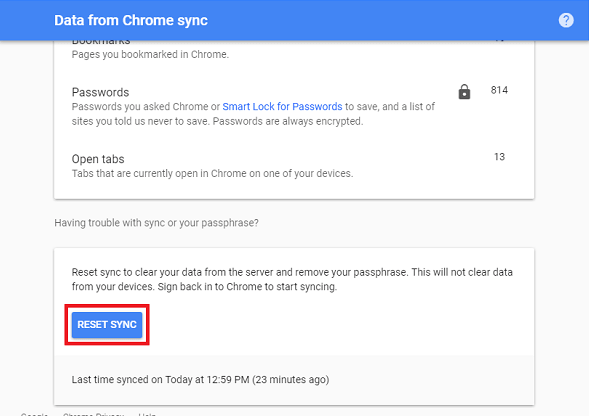
- Open Google Chrome and navigate to the following address:
chrome.google.com/sync - In the displayed window scroll down to the bottom and click on the Reset Sync button:
- The following message will be displayed; there click on the OK button and follow the steps of the wizard
Method #3: Sign Out from your Google Account
As I have mentioned before, to carry out the synchronization process in Google Chrome correctly, you must associate the same account in all the devices. When your computer and Google Chrome don’t sync correctly, you can try to sing out and log in to your account.
To do this, follow these simple steps:
- Open Google Chrome and click on the Customize and control Google Chrome button (three dots icon)
- In the menu click on the option Settings
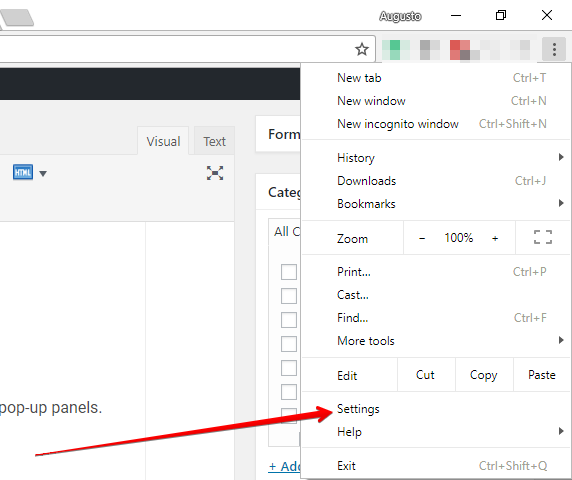
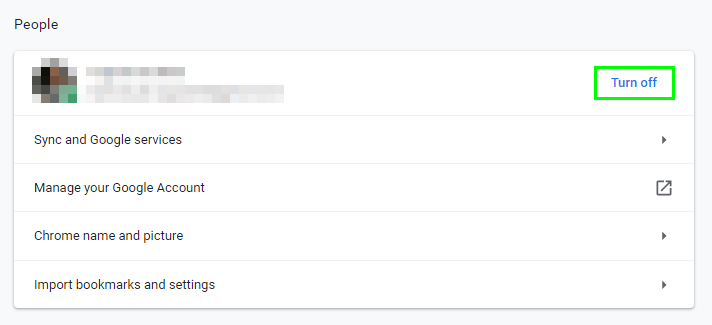
- In the new window that opens, click on the Turn off button located right next to your account:
Method #4: Update Chrome
When Google Chrome doesn’t sync correctly, maybe you don’t have the latest version installed on your computer. In most cases, the browser will check for updates every time that you launch the software, but in some cases, this updating process could be disabled by you or some third party program like system optimizers.
You can try to update Google Chrome in two different ways, the first one from the browser itself like this:
- Launch Google Chrome as an administrator. To do that, right-click on the shortcut and select Run as administrator
- Once opened, you need to open the three dots icon “Customize and control Google Chrome.” There navigate to the menu Help and there click on About Google Chrome
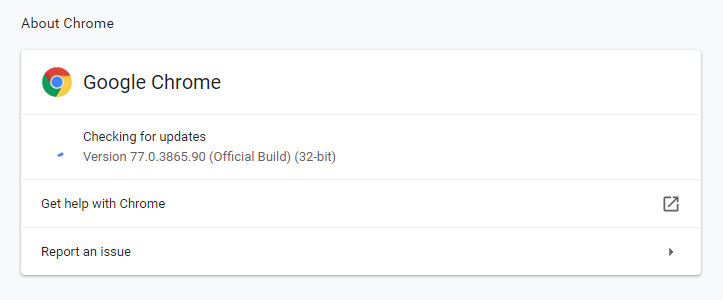
- Now you only need to wait because the browser will start automatically checking for updates and then you only need to click on Instal or Update
Another way to update Google Chrome is by downloading the installer manually.
- You will need to open Google Chrome and there navigate to the following link. Download Chrome
- There you need to click on the button Download Chrome
- A window will appear, there you can uncheck the option to send data to Google and then click on Accept and Install
- Once download, run the file. The installer will find your Google Chrome installation, and it will start the updating process
https://www.google.com/intl/en_us/chrome/
- When the update process finishes, launch Google Chrome and try once to sync your account.
Method #5: Disable Extensions
As a standard Google Chrome user, you may have installed some extensions like an adblocker or password manager. It is true that the extensions are useful in several cases and can help you to improve your productivity while you browser, study, or work, but when you have a problem sync Google Chrome you will need to take action.
Some extensions are known for having issues or conflicts with the Google Chrome sync process. That’s the case of some VPN like TunnelBeard and HostpostShield, but also, some Youtube extension has been reported as the culprit of the issue.
Therefore, you can try to disable your extensions temporarily while you try to sync your Google account on Chrome. If you want to do that, follow these steps:
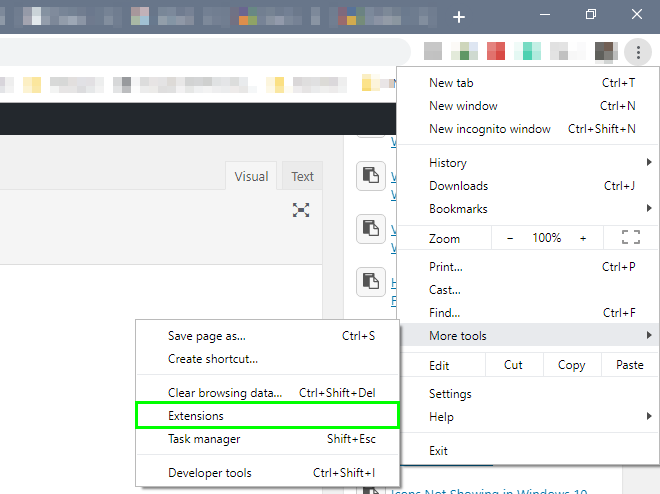
- Launch Google Chrome and open the three dots menu. There navigate to the menu More tools and click on Extensions
- Now you will see all the extensions that you installed and enabled at the moment
- Disable all the extensions by moving the switch one by one
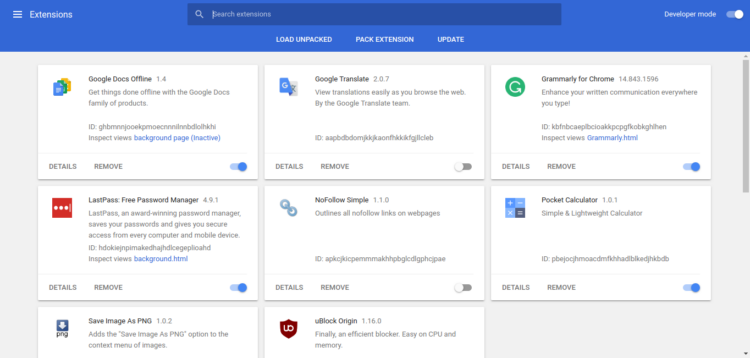
- When you finally disable all the extensions, try once again to sync your Google Chrome account
- If you successfully sync your account, you need to go back to the extensions page and enable each extension one by one. In that way, you will find the problematic extensions that you need to replace or remove.
Method #6: Disable and Enable Sync
One of the advantages of Google Chrome sync is that it can be done between two or more devices with Google Chrome. In this way, the data will be synchronized automatically, but when this doesn’t happen, a solution is to disable synchronization on the second device temporarily.
To do this, follow these steps.
- Open Google Chrome and click on the menu button, then select the option Settings
- Under the section, People click on the button: Sync and Google services
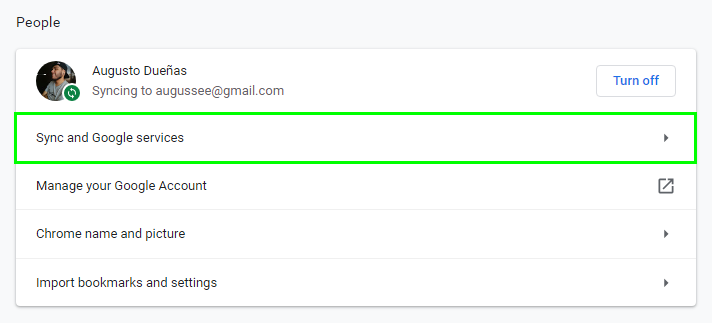
- Then click on the button Manage Sync.

- Now, disable the switch Sync everything.

- Wait for a period of 5 to 10 minutes and again select which options have to be synchronized and confirm that it is done correctly.
Method #7: Reinstall Google Chrome
In case nothing of the methods above work, a more extreme process is to uninstall Google Chrome from Windows and reinstall it again. The advantage of this is that when you log in again, all the configuration will be loaded without losing anything.
To uninstall Google Chrome from Windows follow these steps:
- Open the Run window using the keyboard shortcut: Win + R
- On the box type the command
controland press Enter - Once in the Control Panel, navigate to the section Programs and then click on Programs and features
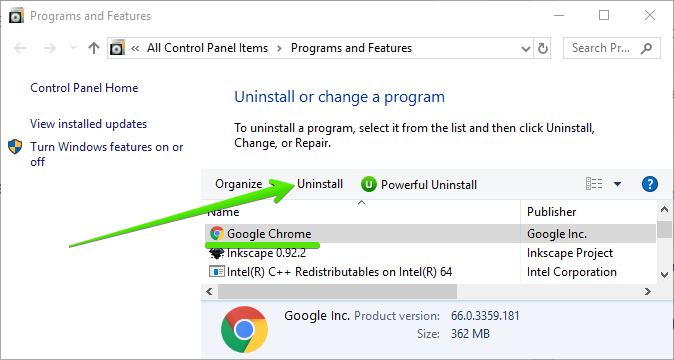
- There you need to find the Google Chrome app and select it
- At the top click on Uninstall button
- Then, download Google Chrome from the following
- Finally, install Google Chrome as usual
Method #8: Clean Cache
As you frequently navigate in Google Chrome, the cache of the visited sites is stored, which can have a negative impact by having enough cache stored, in this case, follow these steps to clear the cache.
- Open Google Chrome
- Press the keyboard shortcut: Ctrl + H
- On the left side, menu click on the line Clear browsing data
- The following window will be displayed where you need to check the boxes Cookies and Cache
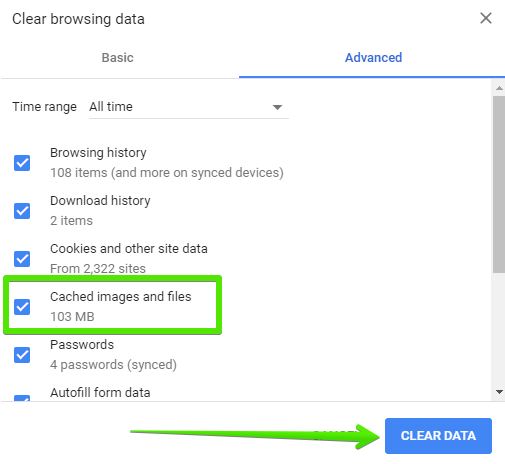
- Finally, click on the button Clear Data
Method #9: Log out from All Devices
On some occasions, when several devices are associated, a synchronization error is generated due to the number of these.
As the last resource, you can try to log out from all devices and then only enable synchronization on two devices to check if that fixes the problem.
- Open Google Chrome
- Click on the menu icon and then select Settings
- Under the section People, you will see your account, and you need to click on the button Turn off

- Do this for all the devices and then enable sync only two of them.
Wrapping Up: Chrome Sync Not Working
So far, those were the best ways to fix the synchronization of Google Chrome. Remember to follow these steps carefully and try them in two devices.
Must read: Failed to Enumerate Objects in the Container [Fix]
I hope this tutorial helps you if you have any question, let me know in the comments section below.

