Windows key not working on Windows 10? In this post, I will show you some ways to help you fix the Windows button or Winkey.
The so-called Winkey, which many also call the Windows button, has for name the Windows key and has been incorporated into computer keyboards since the launch of the Windows 95.1 operating system.
It is a key created to be used on those computers that have the Microsoft operating system, and that is why when the said company developed an exclusive license for keyboard manufacturers accompanied it since the said key has as an image the Windows logo.
From then on, for several years now, both individual keyboards for desktop PCs, as those that are part of notebooks and netbooks, have incorporated this Windows key as a fundamental part of the manual, since the truth is that it has a series of essential functions, and allows shortcuts for access to different functionalities.

What is the Windows key?
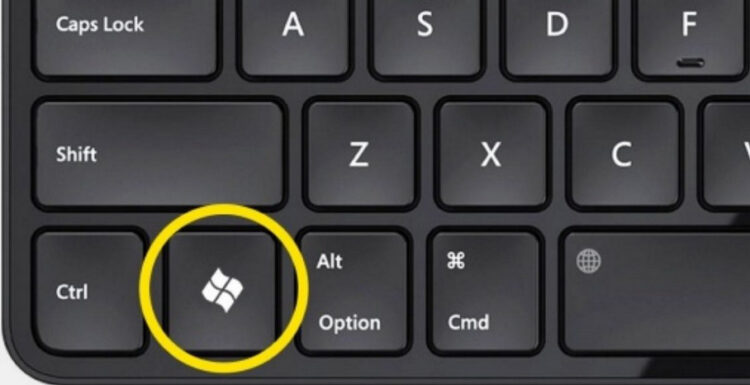
As I mentioned, the Windows or Win key can be quickly identified, since the traditional Windows logo is printed on it: the window.
As for its physical location, the Windows key is located on the left sector of the keyboard, precisely between the Ctrl and Alt keys. In most of the current ones, you can find a single Win key, but in the oldest or other current versions, you may see two Win keys.
This is because in principle the keyboards incorporated two Windows keys and a menu key, which at the time meant a change in the keyboards since they went from having 102 keys to having 105 keys.
Today, in most cases you can find that your keyboard has a Win key in the left sector of it, as I said between the Ctrl and Alt keys, and a menu key in the right, between the AltGr and Ctrl keys.
It should be noted that while the Win key has been created for use with Windows, the truth is that it can also be used with other operating systems, such as different Linux distributions.
Of course, in these cases, the user must configure the functions that are designated to the Win key.
But why sometimes this Windows Key is not working? That is the question from several users that has this problem in Windows 10.
Troubleshooting Hardware Problems
The truth is that the causes that can cause the Windows key not working can be very varied but also some hardware issues.
The first hardware issue is that the key has broken down on your keyboard. Therefore, it will be enough to replace the current keyboard with another one that you have at hand and check if the Windows key works correctly.

If you can, also try to connect the same keyboard in another computer to check that the Windows key is working correctly there.
When you rule out hardware issues with your keyboard, you can continue with the solutions.
Solution 1: Restart Windows Explorer
One of the first fixes to problems with the Windows key is to restart the Windows Explorer process. But why restarting this process could fix the issue? Well, the Start Menu and Taskbar works thanks to this process, and when it gets stuck or freezes, you won’t be able to use the Windows key to open the Start Menu as usual.
If you want to try this quick fix, follow these steps:
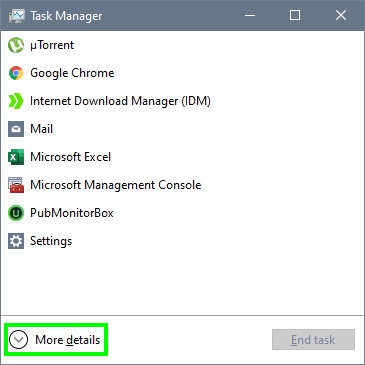
- You can right-click in the Taskbar, and in the menu that opens, click on Task Manager. If that doesn’t work, you can press the keys Ctrl + Shift + Esc
- In the window that opens, click on the button More details
- Now you will see all your processes, there scroll-down, and select the Windows Explorer task. Then click on the button End Task
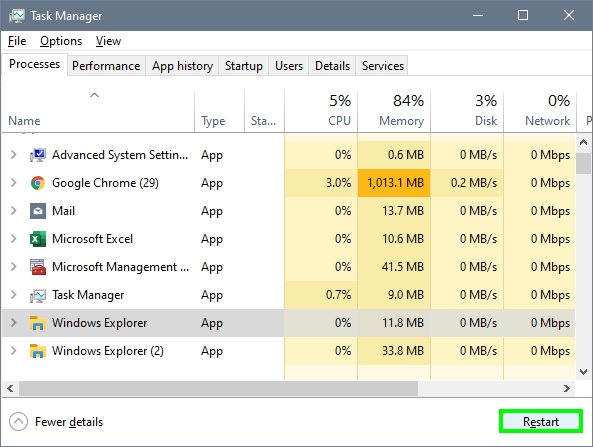
- The Windows Explorer process will restart automatically, and once you see the taskbar you can try to use the Windows key
Solution 2: Disable Filter Keys
On Windows 10, there is an accessibility feature that lets you slow down some repeated keystrokes. This feature has been the culprit for some of the users that cant use some Windows key shortcuts, and if you are one of those, you can try to follow these steps to disable this feature.
- First, you need to open the Settings utility from the Start Menu (cogwheel icon located at the right)
- Now you need to click on the section Ease of Access
- In the left side you will see some options, there scroll down and click on Keyboard
- Finally, on the right, disable the switch Filter keys and then close the Settings utility
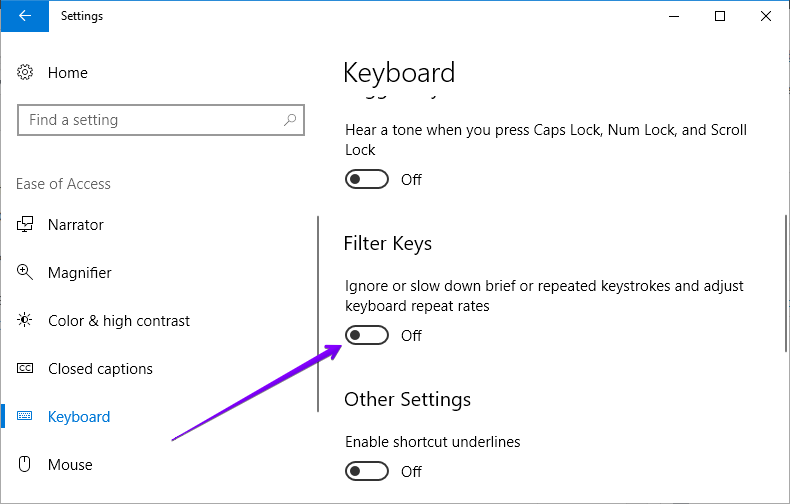
- Now you can try to use the Windows key to verify that is working properly
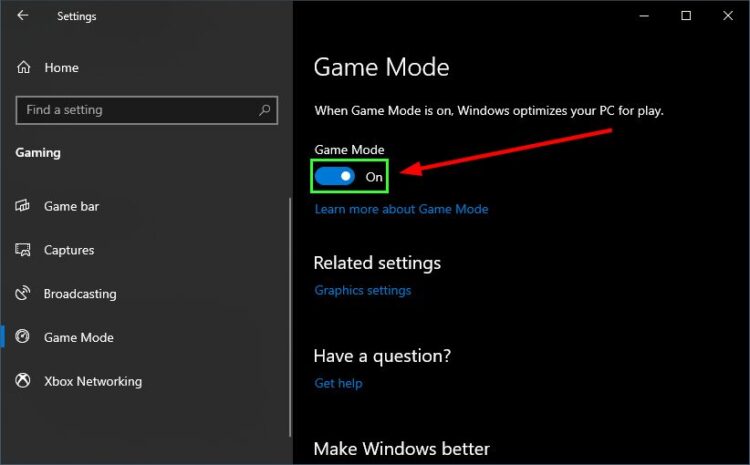
Solution 3: Disable Game Mode
Another of the things that can cause the Windows key not working is usually the Windows 10 Game Mode because if your keyboard supports game mode at the hardware level, the system automatically locks the Windows key to prevent a keystroke accidentally show you the Start menu and annoy the game.
To disable Game Mode on Windows 10, follow these simple steps:
- Make right-click on the Start Menu button on your desktop
- On the menu, select the option Settings to open it.
- There click on the option Gaming
- On the left, click on the option Game Mode
- On the right, find the section Game Mode and click on the switch to disable it.
Solution 4: Disable Winkey Lock
Some keyboards come with the lock button of the Windows key, in this way, you can easily activate or deactivate it when you want to play and prevent any unintentional presses from showing you the Start menu.
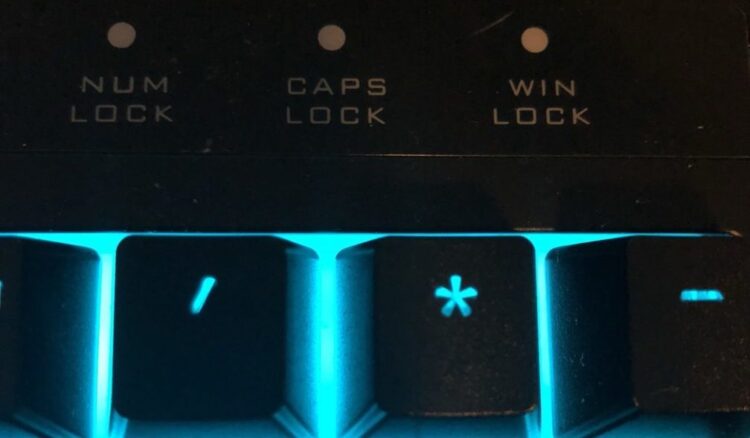
Check if your keyboard is one of these and unlock the key so you can fix easily the Windows key not working.
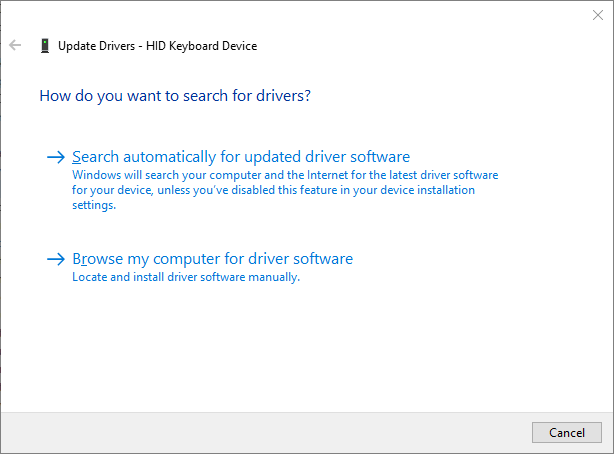
Solution 5: Update Keyboard Drivers
It is also possible that some of the keyboard driver updates caused this problem and the Windows key does not work. Therefore, you can try to update the driver or keyboard driver from the Windows 10 Device Manager. To do that, follow these simple steps:
- Open the Start Menu and type the phrase: Device Manager
- On the results, displayed click on Device Manager to open it.
- Now, find the and open the section Keyboards
- There right-click on your keyboard and select the option Update Driver
- Finally, click on the option Search automatically for an updated driver, that option will find updates for your keyboard if it has one.
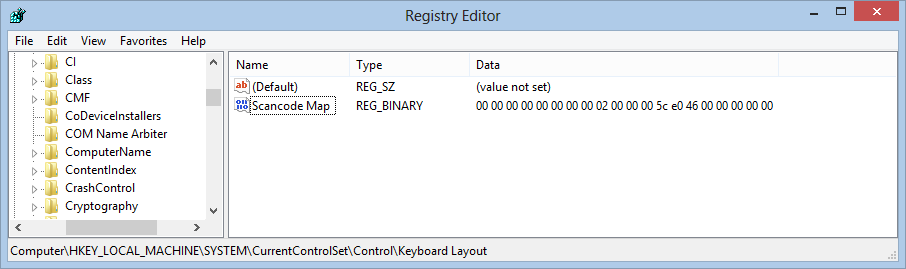
Solution 6: Force Windows Key
Another option is to force Windows to recognize your keyboard again, to do this, you will need to use the Registry Editor, to do that follow these simple steps:
- On the Windows search type the words: Registry Editor
- In the results click on the option Registry Editor to open it
- There navigate to the following path:
HKEY_LOCAL_MACHINE\SYSTEM\CurrentControlSet\Control\Keyboard Layout - Now with the folder Keyboard Layout expanded, find the entry Scancode Map and delete it.
- Once this is done, you must restart the computer and check if the Windows key is already working for you.
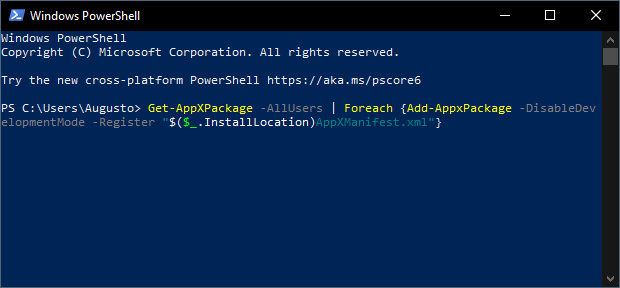
Solution 7: Fix Windows Key using PowerShell
From Windows PowerShell, you can also try to enable the Windows key, to do that follow these steps:
- Open the Windows search and type PowerShell
- In the list of results click on the option PowerShell to open it
- On the PowerShell, copy, paste and run the following command:
Get-AppXPackage -AllUsers | Foreach {Add-AppxPackage -DisableDevelopmentMode -Register “$($_.InstallLocation)AppXManifest.xml”} - Once done, restart your computer and check if the Windows key is working now.
Solution 8: Enable Start Menu
Maybe the problem isn’t that your Windows key is not working, but the Start Menu in Windows 10 has been disabled, and that’s why you can open it using this Win key.
You can try to enable the Start menu on Windows 10 from the Registry Editor, following these simple steps, but remember to be careful and also create a backup of your system.
- First, you need to press the keys Win + R, in the window that opens, type the command regedit and then hit Enter
- You will open the Registry Editor, and there you need to navigate to the following path:
HKEY_CURRENT_USER\Software\Microsoft\Windows\CurrentVersion\Explorer\Advance
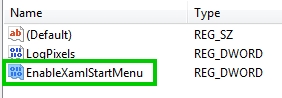
- Once there, open the Edit menu and select the option New > DWORD (32-bit) value
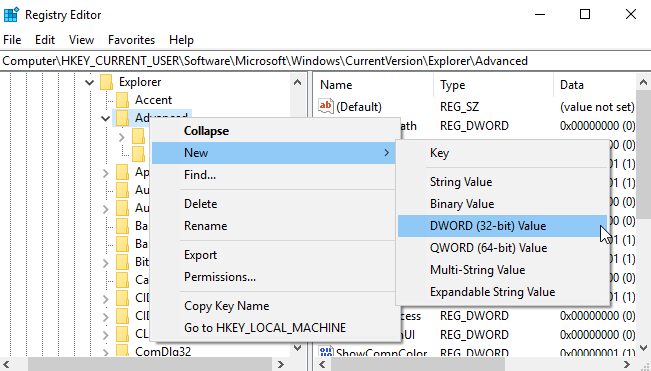
- For the name value, type EnableXamlStartMenu and then click on OK
- Now you need to restart the computer to apply the changes
- When the computer boots, you can try to use the Windows key to open the Start menu
Solution 9: Run SFC
You have tried all the solutions that I leave you below, but nothing seems to work? Don’t panic, and there is one last fix that may help you with this problem.
On Windows you have a useful utility called System File Checker that scan your computer and repair any problem in it. You can use this utility to correct any problem with the keyboard behavior on your computer and therefore fix the Windows key issue on Windows 10.
To run this utility, you can follow these steps:
- First, you need to open the PowerShell as an administrator. To do that, right-click in the Start Menu and select the option Windows PowerShell (Admin)
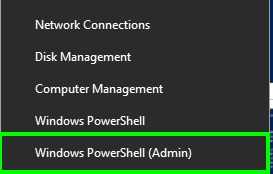
- Once the PowerShell appears, copy the following command:
sfc /scannow - Finally, hit Enter to run the utility and wait until it repairs your computer

- When finished, you need to restart your computer and then try to use the Windows key
Wrapping Up: Windows Key Not Working
The Windows Key is one of the essential keyboard keys for Windows because it is needed for the most keyboard shortcuts and fast opening of the Start Menu.
So when your Windows Key is not working, you will have slow down your work or study if you usually make use of the keyboard shortcuts of Windows. On the tutorial above, I try to show you some of the best ways to fix this Windows key not working error, and I hope that you can fix it quickly.
If you have any questions, leave it in the comments section below, here I will leave some other keyboard issues that may help you: