WSAPPX process is causing high CPU and disk usage? On this post, I will talk about what it is and how to fix it in several ways.
Windows 10 has several useful services and processes that are running in the background and which by default should not affect the optimal performance of the system and its components.
But with the new updates of Windows 10, you may have seen a process called WSAPPX which is part of the operating system itself taking a high amount of disk or CPU usage.
What is WSAPPX?
This WSAPPX process is associated with the Windows Store and Universal Windows Platform (UWP).
In summary, its main task is related to the management, installation, removal, and update of apps from the Windows Store. So, if you don’t use these apps, you can try to disable it to gain some performance.
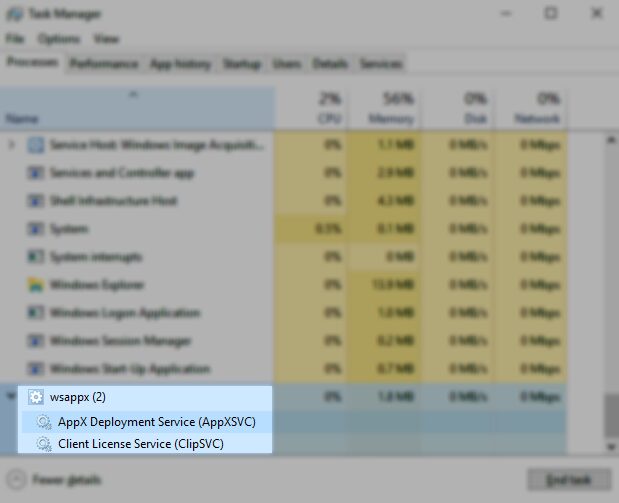
This process usually has three internal services that are: AppX Deployment Service (AppXSVC), Client License Service (ClipSVC) and Windows Store Service (WSService).
All desktop apps that you run in Windows use CPU and disk resources when they are installed, removed or updated, and each one has its process. But when you run Windows Store apps, they use CPU and disk through the WSAPPX process, specifically through AppXSVC.
This service cannot be disabled since don’t run automatically in the background. It only becomes active when you do use some Windows Store apps and stops when you close those apps.
On this post, I will try to help you fix the WSAPPX high CPU and disk usage error on Windows 10.
Method #1: Disable Windows Store trough Group Policies
You can try to disable the Windows Store to fix the error using the Group Policies. This method only works on Windows 10 Pro and Enterprise.
Note: This method will fix for good the high CPU and disk usage error on Windows 10, but it will disable Windows Store. If you usually use these apps, try the next methods.
To disable Windows Store, follow these steps:
- Open the Run window using the keyboard shortcut: Win + R
- In the box type the command
gpedit.mscand press Enter or OK - This command will open the Local Group Policy Editor
- There you need to navigate to the path: Computer Configuration > Administrative Templates > Windows Components > Store
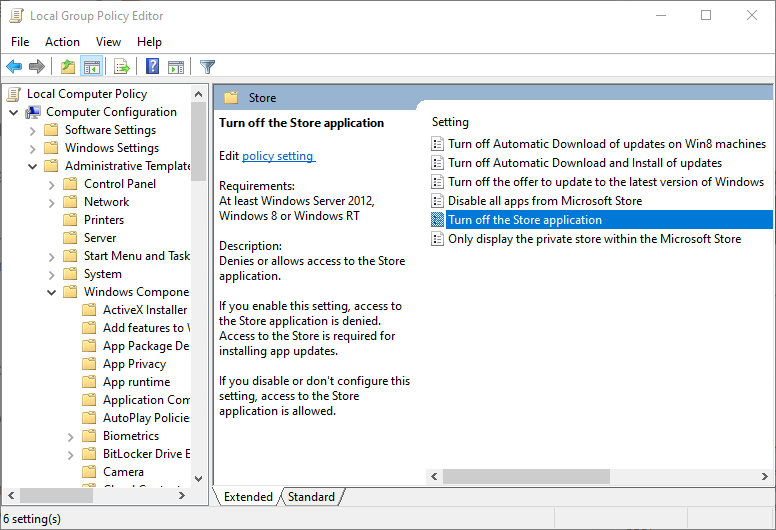
- Once in the Store folder, make double click on the policy: Turn off the Store application
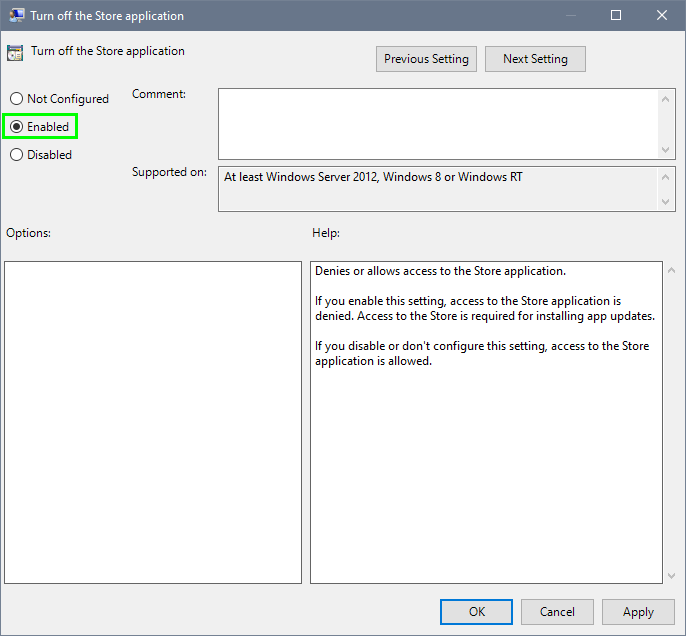
- Finally, you need to click on the option Enabled, then click on Apply and OK to save the changes
Method #2: Add Virtual Memory
If you don’t want to disable the Windows Store, you can try to fix the high CPU and disk usage by adding more virtual memory on Windows 10. Follow these steps:
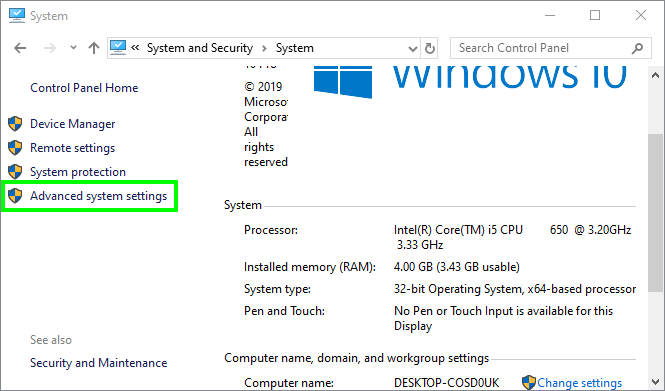
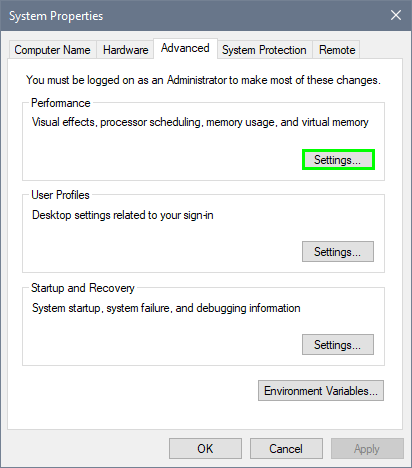
- Open the System window using the keyboard shortcut: Win + Pause
- On the left side menu, click on the line Advanced system settings
- There click on the Settings button under the Performance section
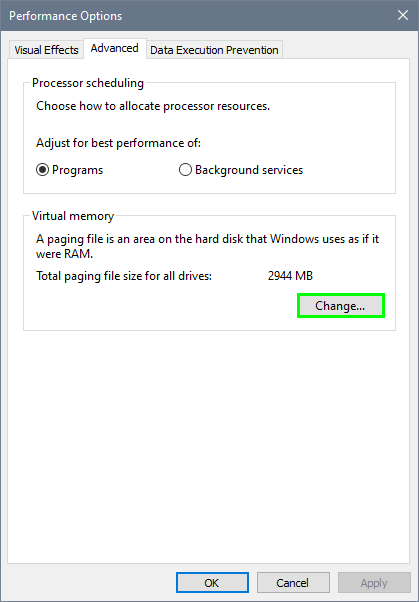
- Now, navigate to the Advanced tab and there click on the button Change under the section “Virtual memory”
- Uncheck the box Automatically manage paging file size for all drivers and click on the option Custom size
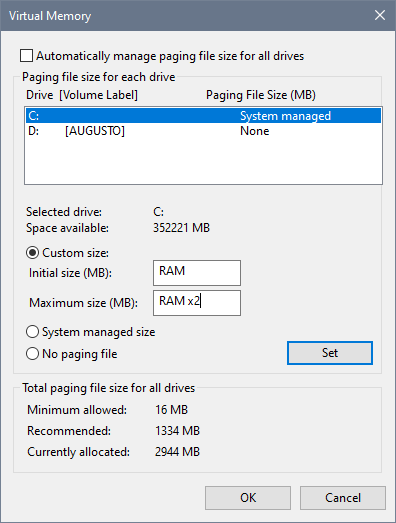
- On initial size, you need to set the amount equal to your RAM and in maximum size the double.
Method #3: Scan for Viruses
Another reason for the high CPU and disk usage by the WSAPPX process is the presence of malware or dangerous viruses that can attack the computer very quickly.
But luckily, this can be avoided or improved with the help of antivirus that has tools capable of analyzing the existence of viruses on the computer, automatically and regularly.
For this, you can use various antivirus programs that are free on the web or even make use of the same integrated app that Windows 10 has to analyze this type of danger on the computer, which is called Windows Security.
To run a virus scan using Windows Security, follow these steps:
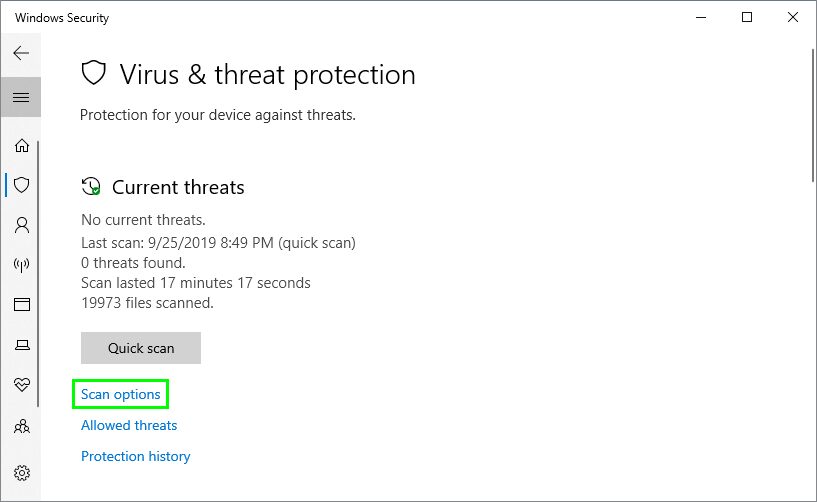
- Double click on the Windows Security icon located in the taskbar

- Once there click on the section Virus & threat protection

- Now, below the Quick scan button, click on the line Scan options
- Scroll down and select the option Full scan and click on the button Scan now
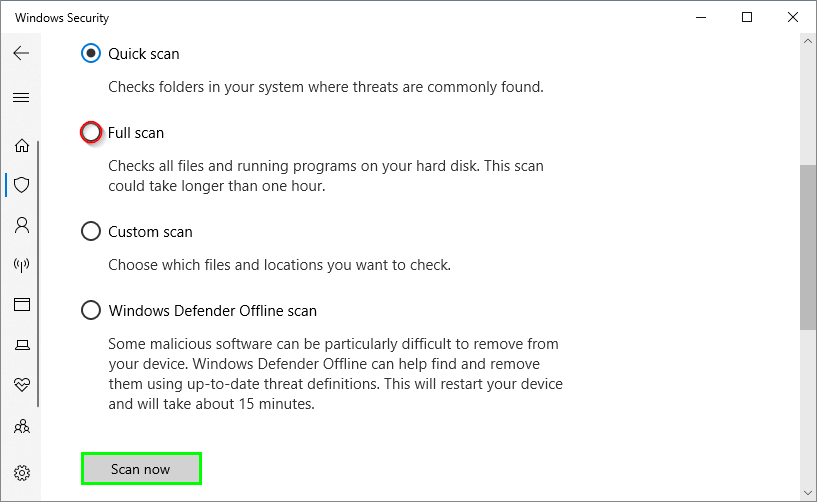
Windows Security will search your entire system for viruses, and if it found something, it will provide you with the procedures to be followed to counteract said malware, and in this way, you will be able to avoid high usage in the system.
Method #4: Repair File System
Finally, you should know that WSAPPX is not the only reason why there is high resources consumption in Windows 10 but that in addition to this process, there are other things that can cause internal damage to the disk.
The same operating system provides you with an integrated tool that has the capacity and efficiency in analyzing the hard disk. You can use this tool to prevent any future problem and, besides, protect your system for any error that could damage your entire data.
To analyze your system and repair errors, follow these steps:
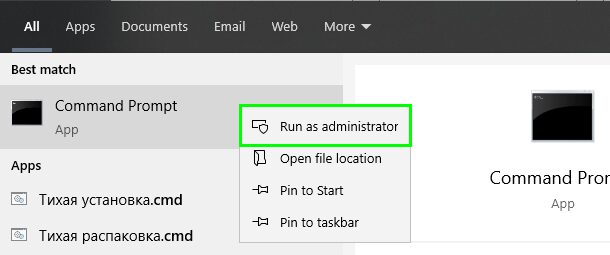
- Open the Start Menu and in the box type the word
cmd - Rightclick on the first results and select the option Run as Administrator
- Once in the Command Prompt, you need to copy and run the following command: chkdsk /f /r
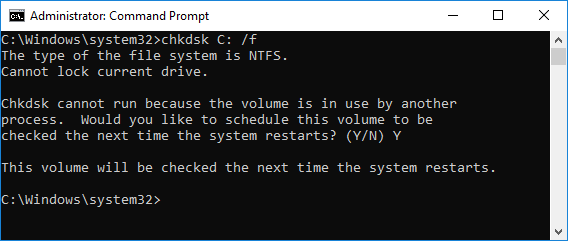
- After that, the system will reboot and will perform a thorough, highly detailed analysis on the disk, looking for errors. In this way, the system can be optimized in general, possibly fixing the high CPU and disk usage from the WSAPPX process.
Wrapping Up: WSAPPX High CPU and Disk Usage
Although it is true, many processes are part of the same operating system, and logically, each one fulfills its specific and unique role that allows give you useful functions that improve the performance of the computer.
But sometimes these processes can affect the performance of your system and consume all the resources available in it. On this post, I try to help to fix this problem with easy to follow methods.
I hope this tutorial helps you if you have any question about it, let me know in the comments section.