If you like to record videos from your computer, play videogames, or use regularly chat and messenger apps like Skype, one of the essential devices that you need to have correctly installed is the microphone.
In this post, I will teach how you to set up your microphone correctly on Windows 10.
Before starting, you should know that there exist several types of microphones for computers, some have an easy USB connection, and some others have the micro or mini-jack cable.
When you have a USB microphone, you will usually need some individual drivers and even some software to set up and configure this mi. While the mini-jack microphones don’t need anything, you can set up those microphones form the Windows 10 settings.
Note: Something that you need to have installed for types of microphones is the sound card drivers.
How to Setup Microphone on Windows 10
To set up your microphone on your computer, the first thing that you need to do is connect it.
If you have installed some microphone software like Realtek HD Manager, you will see a popup window when you connect the microphone.
On this tutorial, as I said in the beginning, we will be focusing on configuring the driver from the Windows Settings.
- To do that, you need to right-click on the Sounds icon located in the taskbar, next to the Date.
- In the menu that appears, you need to choose the option Open Sound Settings.
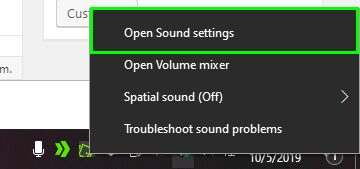
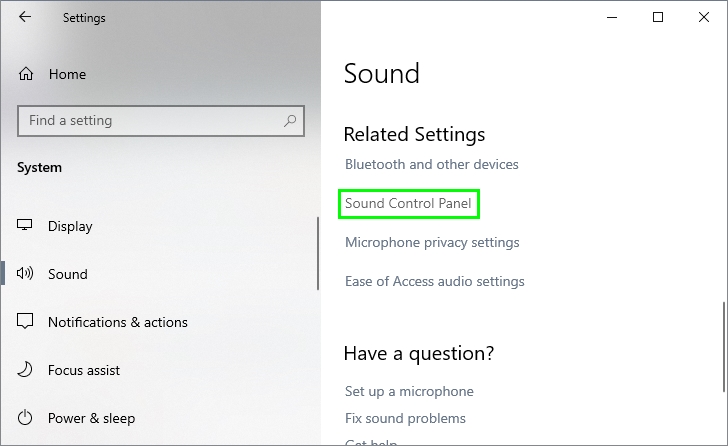
- A new window will open in the Sound settings, and there you need to scroll down and click on the line Sound Control Panel.
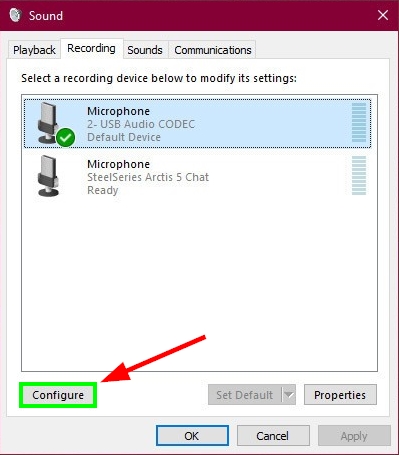
- Once opened the Sound Control Panel, you need to navigate to the Recording tab. There you select your microphone and click on the button Configure.
- In the window that opens, you need to click on the line Set up microphone located in the section Configure your Speech Recognition experience.
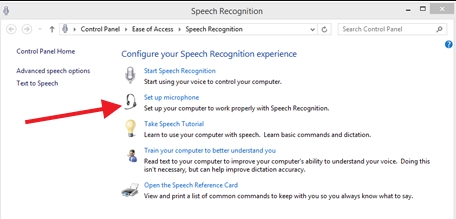
- Now you will need to choose the type of microphone that you want to set up on Windows 10.
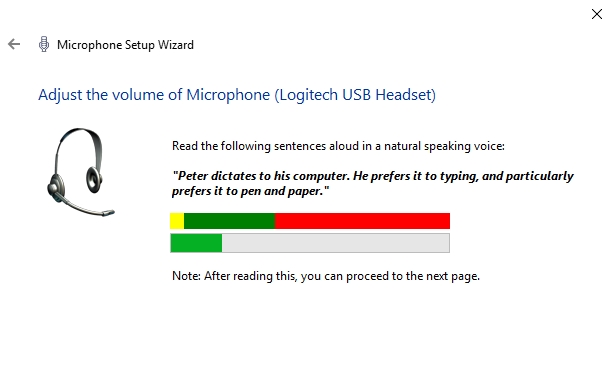
- Then follow the wizard instructions to use the microphone and read the test phrase. When you finished the setup process, you can click on the button Finish.
Now you have setup correctly the microphone on Windows 10, and you can use it on your applications.
Test Microphone
This process will help you to test the microphone to verify that it is working correctly. You need to go back to the Sound Control Panel following the same steps above.
Navigate to the Recording tab, and there you can see some bars next to the microphone. When you speak, you should see some green bards coming up.
Enable Default Device
If you don’t see any green bar popping up in the microphone, maybe it isn’t enabled. For that, you need to right-click on the microphone and select the option Set as default.
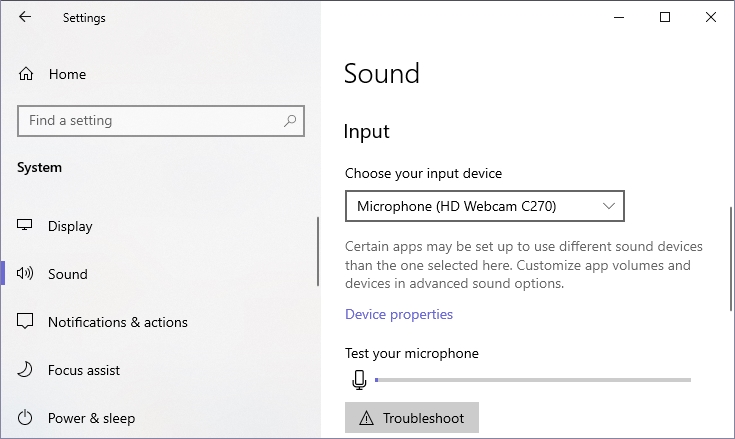
You can also set the device from the Settings utility. Press the keys Win + I. There enter the section System, and in the left-sidebar, click on Sound.
Finally, on the right side, you need to open the dropdown menu. Choose your input device. There you need to choose your microphone, and there you can also see a bar that increases when you speak to the mic.
Now you have set up and tested the microphone correctly on your computer, and it should be working without any issues.
Enable Speech Recognition
One of the best features of Windows 10 that you can enable for your microphone is speech recognition.
To enable that feature, you can open the Control Panel, navigate to the section Ease of Access and there click on the option Speech Recognition.
From there, you can set up the feature and enable it quickly, like in the previous steps.
Wrapping Up
I hope this tutorial helps you to set up your microphone easily on Windows 10 and be able to talk with your friends or record your voice.
You found any problem while you set up the microphone? Let me know in the comments section; I will help you the soonest I can.

