Optimize Windows 10 is an essential task that you need to perform is you want to play your videogames at the highest performance.
Although this new Windows version is well optimized and has, by default, an excellent performance, when you make use of it and modify settings and install programs, that could affect the gaming performance.
For the everyday user, optimize Windows 10 isn’t an essential task because it will only browse and watch multimedia content. Still, when we talk about video games ‘ performance and limited hardware, this could make a big difference.
On WindowsHelper, want to help you to adjust the settings and change certain things on Windows 10 that will help you to optimize your gaming performance.
Note: Before trying to modify the settings and things on Windows 10, you need to verify that your PC meets the hardware requirements of the videogame that you want to play.

Method #1: Game Mode
If you don’t know it already, the game mode is a new feature that optimizes your computer automatically when you play videogames.
How it does work? It disables some services that you need while you are playing and in that way, use more resources in the videogame to improve the experience.
This feature could increase your gaming experience drastically when you are in limited hardware. To enable it to follow these steps:
- Open the Settings pressing the keys Win + I
- Navigae4t to the section Games
- On the left-sidebar, choose the option Game Mode
- Finally, on the right, enable the switch game mode and select the games where you want to activate this feature.
Method #2: Disable Nagle
Nagle algorithm helps you to improve the transmission of the packets between networks applying a small restriction to avoid any overload.
This will translate into a stable internet connection, but when you are playing online games, it will increase the latency.
Latency is one of the worst enemies of every online gamer because it will decrease the response time between the actions that you make and what you see on the computer.
If you want to disable the Nagle algorithm to optimize Windows 10 gaming performance, you will need to make some changes to the Registry Editor.
Note: Follow these steps carefully and at your own risk. Make sure to backup your PC or create a restore point.
- Open the Run dialog pressing the keys Win+ R and copy the command regedit. Press Enter to open the Registry Editor
- Once opened, you need to navigate to the following path: HKEY_LOCAL_MACHINE\SYSTEM\CurrentControlSet\Services\Tcpip\Parameters\Interfaces
- Now you need to find the folder DhcpIPAddress that has your IP address inside. If you don’t know your IP, run the command
ipconfigin the Command Prompt. - Now you need to create two new values inside, with the names TcpAckFrequency and TCPNodelay
- Doubleclick on both value and set the parameter to 1
- If you want to disable them after some time, you only need to change the setting to 0
- Restart your computer, and you will have disabled the Nagle algorithm
Method #3: Update GPU
Your graphics card drivers are an essential component when you are going to play videogames because they will help you to render your games smoothly and make it compatible with your operating system.
If you are using outdated drivers, you will have performance drops, errors, and graphics failures, and you can even experience freezing issues, reboots, and incompatibility that will worse your gaming performance.
Luckily, updating the graphics card drivers is an easy task. You will only need to visit your manufacturer’s website, and there find and download the latest drivers.
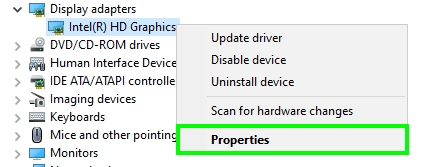
If you don’t know the name of your graphics card, you need right-click on the Start Menu, and there choose the option Device Manager.
Now open the section Display adapters, and there you should see the name of your graphics card.
Method #4: Change PowerPlan
The power plan that you use can make differences between the performance on your computer and the energy consumption as well.
When you use a laptop, the best power plan usually is Balanced, but if you are going to play games on Windows 10, you need to make changes.
In this case, you can use the power plan High performance that will allow you pc components to run at the highest performance.
To choose that power plan, you can follow these steps:
- Open the Run dialog and there execute the command
control - Once in the Control Panel, navigate to the section Hardware and Sound. There click on Power Options
- You will see the three power plans available, check the High-performance option and click on the button Save changes

Method #5: Disable Visual Effects
This setting will reduce the resources consumption of the operating system and avoid any performance problem while you are playing your games.
Recall that this also will improve your overall Windows 10 experience because it will use fewer resources on shiny visual effects, and you can also use it for your everyday tasks.
To disable the visual effects, follow these steps:
- Press the keys Win + R to open the Run dialog
- Copy the command
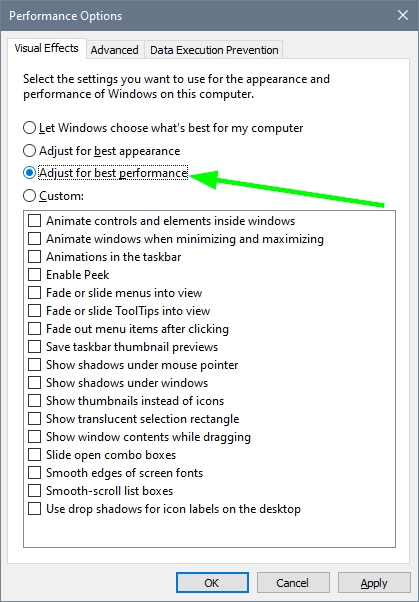
sysdm.cpland hit Enter - Navigate to the Advanced Settings tab and click on the button Settings located in the Performance section
- In the new window that opens, check the option Adjust settings to better performance and click on Apply to save the changes
Method #6: Disable Startup Apps
With this method, you will reduce the resources consumption that the programs at startup use and even boot your computer faster. Thanks to these you will have a clean computer with better performance on videogames.
To disable startup apps, follow these steps:
- Press the keys Ctrl + Alt + Esc to open the Task manager
- Click on the button More details and then navigate to the Startup tab
- There you can see the program that runs at startup and the impact that has on the boot of your computer. You can disable the one that has a high impact clicking on the button Disable.
Method #7: Optimize Hard Drive
An optimized hard driver will help you to increase your FPS on your videogames and in that way, enjoy a better experience.
Windows 10 has included a useful utility that helps you to schedule this task automatically with a daily, weekly, and monthly setup.
If you have an HDD or SSD, it is recommendable to program this tool to optimize your hard drives weekly.
To run this utility follow these steps:
- Navigate to the hard drive that you want to optimize and right-click on it. In the menu that opens choose the option Properties
- in the Properties window, navigate to the Tools tab
- There you need to click on the button Optimize, and there you can set the weekly optimization process.
I hope this tutorial helps you to optimize your Windows 10 gaming performance. If you have another tip or need some help, let me know in the comments section.