Your IPv6 is showing the message No Internet Access? Well on this post I will show you how to fix the error: IPv6 Showing No Internet Access.
In this tutorial, I will show you how to correctly configure the IPv6 protocol that is often responsible for the impossibility to establish Internet Access.
Whether you receive this message or not, but still don’t have an internet connection, I recommend to try any of the methods mentioned below
Method #1: Disable IPv6
The first thing you will have to do is check if you access the internet using the IPv4 protocol rather than the IPv6.
To disable IPv6, follow these simple steps:
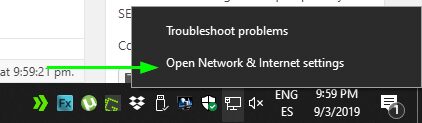
- Rightclick on the network icon located at the bottom right of the Taskbar and select Open Network & Internet Settings
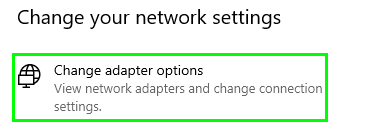
- Scroll down and click on the option: Change adapter options
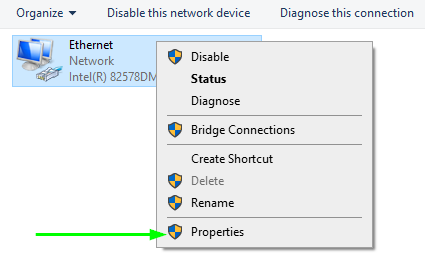
- Now right-click on your default network device and choose the option Properties.
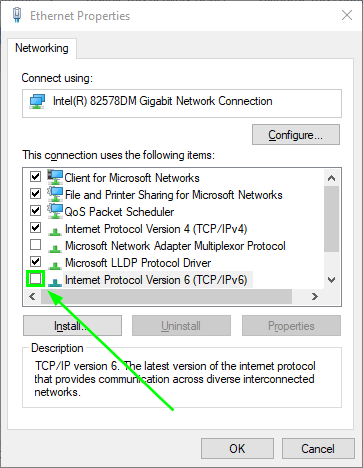
- On the window that opens find the Internet Protocol Version 6 line and click on their box to disable it.
- Finally, click on OK and check if you have an internet connection
If after following this method you still get the error IPv6 showing no internet access, continue with the next method.
Method #2: Customize IPv6 and IPv4 Settings
If you continue without an internet connection, you will need to check if you have a static or dynamic IP.
In case they are in static, you must configure them as automatic. To do this, follow these steps.
- Rightclick on the network icon on the Taskbar and select Open Network & Internet Settings
- Now click on Change adapter options
- Rightclick on your default network device and select properties
- Once on your network device properties double click on IPv6
- There you need to select the option Obtain an IPv6 address automatically and Obtain DNS server address automatically.
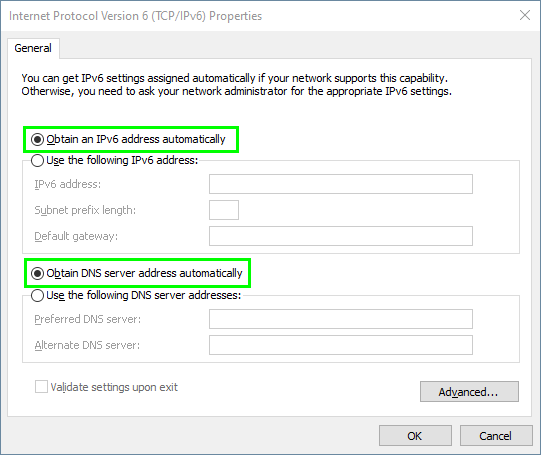
- Click on OK and repeat the same process but this time with IPv4
- Now close all the windows and try to access the internet again
Hopefully, this fix will work for you, but if you still have the IPv6 showing no internet access error, continue with the next method.
Method #3: Reset TCP/IPv Protocol
If you still don’t have an internet connection, you must now check the TCP/IPv protocols. To do this, follow the steps below:
- Press the keyboard shortcut: Winkey + R
- On the Run, window type the command cmd and press Enter
- In the Command Prompt, you must copy and run the following commands shown below. Remember that the commands must be entered in the order that I show you:
netsh int tcp set heuristics disabled
netsh int tcp set global autotuninglevel=disabled
netsh int tcp set global rss=enabled
netsh int tcp show global
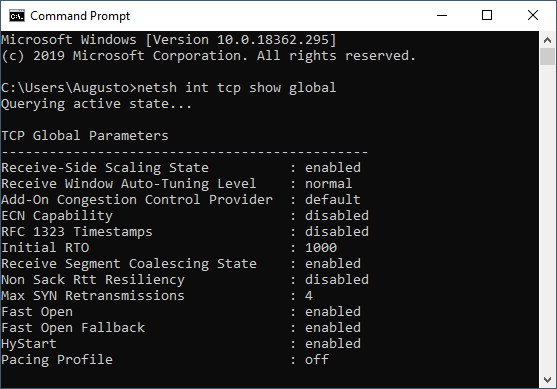
Once you have run them, remember to restart your computer. Once restarted, you should already have access to the internet.
Method #4: Update Network Adapter Drivers
However, if you still have the IPv6 showing no internet access error, in this case, the problem is almost certainly due to the drivers of your Wireless or Ethernet network adapter.
To try to solve it, you must check if you are using the correct drivers. To do this, follow these steps:
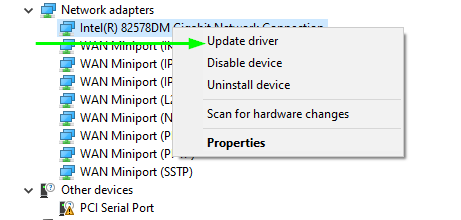
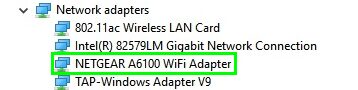
- Rightclick on the Start menu and select Device Manager
- Open the section Network adapters
- Now find your default network device either Ethernet or Wifi and right-click on it, then click on Update Driver
- A new window will open where you have to click on the option: Search automatically for updated driver software.
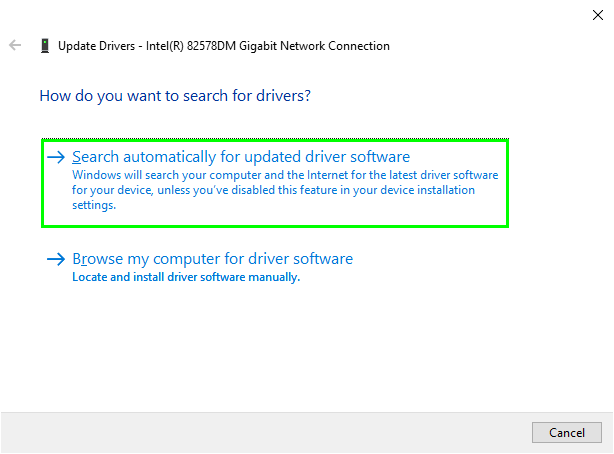
- Windows 10 will search and find for you the appropriate driver.
This method works on almost all cases, when you restart your PC, the IPv6 showing no internet access error will be fixed.
Method #5: Update Network Adapter using Manufacturer Drivers
Finally, if the above doesn’t solve the problem, all you have left is the search and installation of the latest version of the drivers manually.
To find your drivers, you will have to use the name of your network adapter, which is shown in the Device Manager.
Once you have the name and model, go to the official website of the manufacturer of your computer or your network card.
Once inside you must search for the latest version of the network drivers of your Wireless card. The search can usually be done from the sections: Drivers, Downloads or Support.
Once downloaded, proceed to the installation of said drivers downloaded for line followed by restarting your computer and verify that your computer can now connect to the internet.
Method #6: Reset your PC
If none of the above has worked for you, this last method will work regardless of whether or not you have done any of the above and fix the error IPv6 showing no internet access.
I’m talking about the Reset this PC feature. This feature’s name doesn’t mean that you lose our files or programs installed on your computer.
With the reset of your Windows operating system, what you will do is restore its default settings.
To reset your PC, follow these steps:
- Press the keyboard shortcut to open Settings: Winkey + I
- There click on the option Update & Security
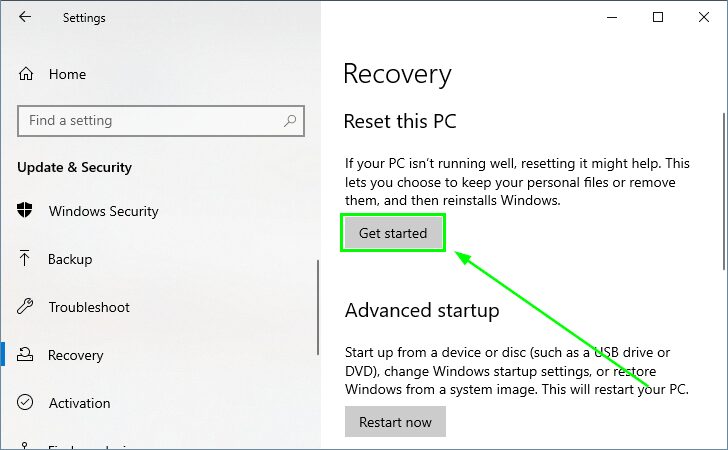
- Once you access that option, on the left part, click on the option Recovery
- Now on the right, you will find the section Reset this PC. There click on the button Get started
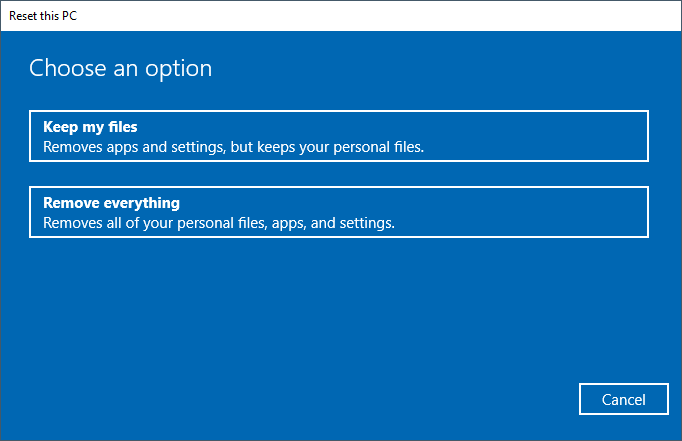
- A new window will open where you have to choose the option: Keep my files and start the process of resetting your PC.
This process will restart your computer and display a series of blue screens, once finished you will have the error IPv6 showing no internet access error fixed.
Wrapping Up: IPv6 Showing No Internet Access
As easy as following the methods mentioned above, you will fix this annoying error and enjoying again the multimedia content that you usually access through the internet.
If you have any question about this tutorial, let me know in the comments section below.
Must read: