Do you want to know how to your VRAM? On this post, I will show how to increase dedicated video RAM on Windows 10, 8 and 7.
You can increase the VRAM available on your pc, but if your hardware isn’t compatible, you can also fake that amount on Windows.
The first thing I would like to tell you is that if you want a real boost to performance, you will most likely need a dedicated graphic.
These methods will give you some improvement or allow you to run games and programs that you couldn’t because of the lack of RAM, but the difference in performance will be small.
What is the Dedicated Video RAM (VRAM)?
VRAM is a type of memory specially designed to carry out a specific kind of tasks in graphic apps and video games. We can say that the VRAM is to the GPU what the RAM to the CPU.
VRAM has a particularity: the high frequencies at which it works. To illustrate this, nothing better than a comparison. While DDR4 memory works with a 128-bit data bus and a clock frequency of 3000 MHz, the GDDR5X memory used in graphics cards such as the GTX 1080 has a 256-bit bus and a speed of 11 GHz.
In addition to higher speed and bandwidth, this type of memory has a lower consumption, the core to its operation, since it allows to increase the voltage by keeping the temperature at adequate levels while obtaining an excellent performance and frequency.
How Much Dedicated Video RAM Has My PC?
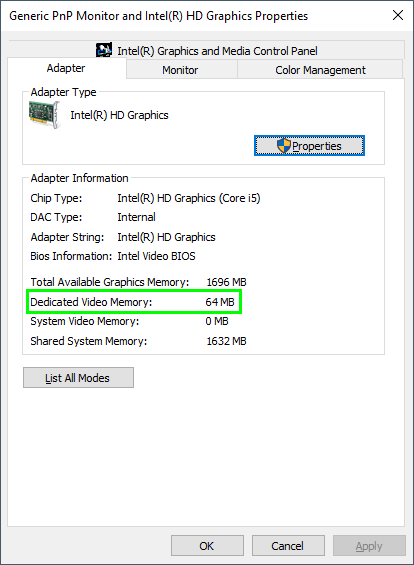
To find how much you have allowed to the dedicated video RAM, you need to follow these steps:
- Rightclick on any blank part of your desktop and select the option Display Settings.
- Scroll down and under the section Multiple displays, click on the option Advanced display settings
- Now click on the option: Display adapter properties for Display #
- On the window that opens, you could see the amount under Dedicated Video Memory.
Method #1: How to Increase Dedicated Video RAM (VRAM)
If you want to increase the dedicated video ram, the essential requirement is that the hardware is compatible. This means that both the processor must have integrated graphics (APU), and the chipset and board must support these modifications.
This method will work on both laptops and desktop PCs to do it follow these simple steps:
- Restart your computer and enter the BIOS settings. Typically you will need to press special keyboards keys while booting according to your motherboard manufacturer, for example, ESC, F2, F8, or F12.
- Once in the BIOS/UEFI, it will depend on the version and the manufacturer, but it is not difficult to find the settings on each brand.
- You should look for an advanced menu, advanced chipset features or similar. There you will see that several options or submenus appear, some related to graphics settings, video settings or VGA memory.

- If you deploy it, it should appear to you to select between several quantities of MB. Usually, it is predetermined in 128MB or 64MB depending on your hardware, but it is there to put the maximum value that your amount of RAM allows you.
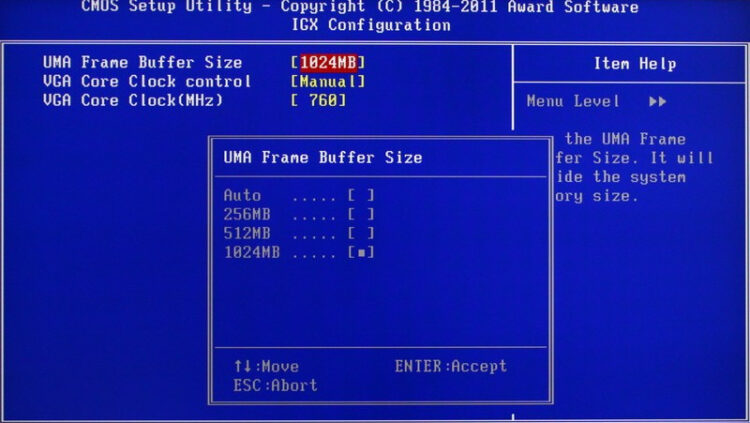
Think that the RAM you dedicate to graphics will not be available for the system, so if you have little you may want to adjust this parameter. Once changed, save the changes, the PC will restart, and Windows will detect the new amount of VRAM.
As easy as that you learn how to increase dedicated video ram on your computer or laptop
Method #2: Fake VRAM on Windows
Now, if you tried the previous process and there was no menu even remotely similar, you can do two things.
Take some photos of your BIOS and put them in a comment, or in case you want to increase it because some program or game doesn’t run because it has little VRAM you can change the value manually (fake it).
To increase dedicated video ram, you will need to use the Registry Editor. I always warn you to do it at your own risk, since if you touch something and make adverse changes, you can damage your system.
To modify your dedicated video RAM amount, follow these simple steps:
- Press the keyboard shortcut: Winkey + R
- Copy and paste this command:
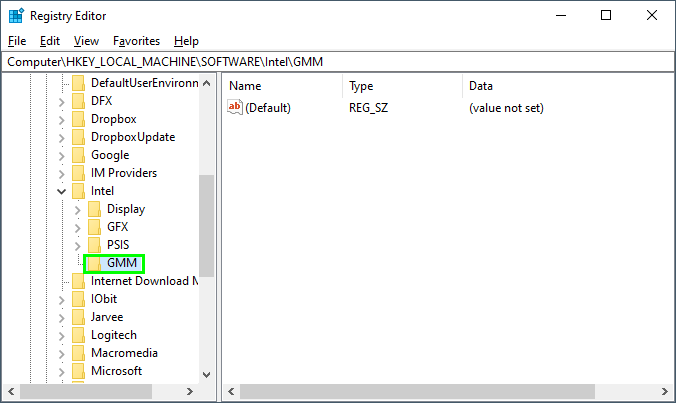
regeditand press Enter - Once in the Registry Editor, navigate to the following path: HKEY_LOCAL_MACHINE\Software\Intel
- Right-click on the Intel folder and create a new key named GMM in uppercase.
- When it appears, right-click on GMM, and now you have to create a DWORD 32-bit value. Save it with the name:
DedicatedSegmentSizeand select the Decimal option.
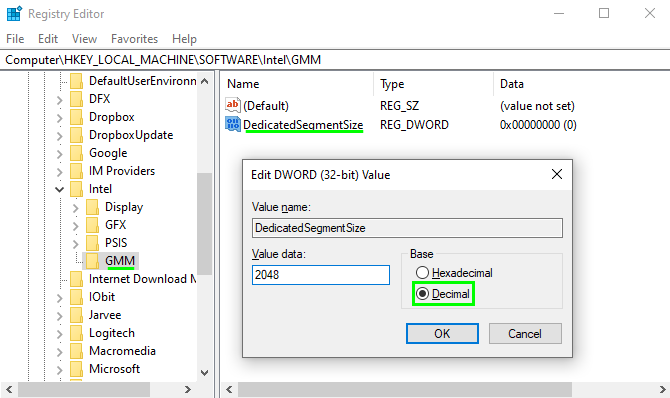
- The number you put will be the “megabytes” of dedicated video RAM or VRAM that you want to appear in the operating system.
- After this, you only have to restart so that the changes take effect and you can see in the hardware properties the new size of your graphic.
Remember that this method is like a placebo, and it will not impact on the performance of your system.
Wrapping Up
As easy as following the steps I mentioned above, you can increase the dedicated video ram of your computer. Remember that the only way to increase this amount is thought your BIOS settings (if your CPU is compatible). The other method only works as a fake amount to bypass some apps requirements.
I hope this tutorial helps you to increase your VRAM, if you have any question, leave it in the comments section below.