When you power on your PC, you see the following message: Failed to Connect to a Windows Service. On this post, I will show you how to fix it.
Windows operating systems are based on processes and services which allow each application, program, and system component to work correctly without any problem.
Failed to connect to a Windows Service Error
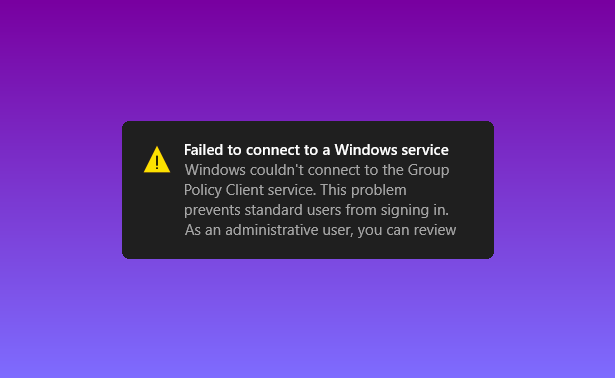
But as in any operating system, at specific times some error can be generated, and a widespread one is that the operating system is the error Failed to Connect to a Windows Service which can cause a severe error to run an app or even it can kill some processes.
That’s why on this post I will show you some of the best methods to fix this error quickly.
Method #1: Reset Netsh Winsock
Winsock is in charge of providing all TCP/IP services in the system, so one of the most viable solutions is to reset it to validate that the services can connect again as expected.
To perform this process, follow these simple steps:
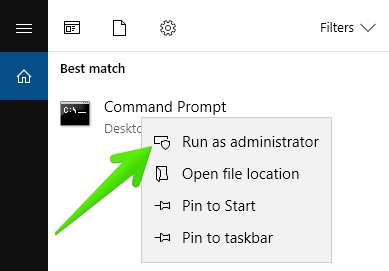
- Open the Windows Search using the keyboard shortcut Winkey + S
- Type the word: cmd
- In the results, right-click on Command Prompt and select the option Run as Administrator
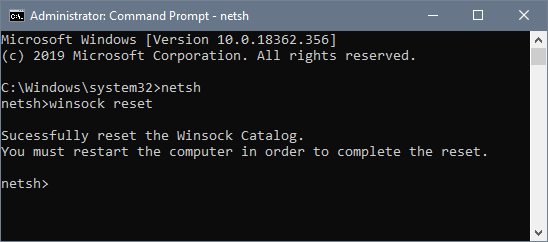
- Once in the CMD, copy and paste the following command:
netsh - Then copy and run the following command:
winsock reset - Finally, restart your computer to apply the changes.
Method #2: Registry Editor
Windows Registry allows you to carry out a wide range of control, support, and administrative actions, so you must be careful in the way you manage it.
When you see the message: Failed to Connect to a Windows Service, the Registry Editor could help you to fix it. Follow these steps carefully:
Note: Create a backup before proceeding to change values in the Registry Editor, you can do that from the menu File > Export.
- Open the Run window pressing these keys at the same time: Winkey + R
- On the box copy and paste the command
regeditand press Enter to open the Registry Editor. - Once there navigate to the following path: HKEY_LOCAL_MACHINE\SOFTWARE\Microsoft\Windows NT\CurrentVersion\Svchost
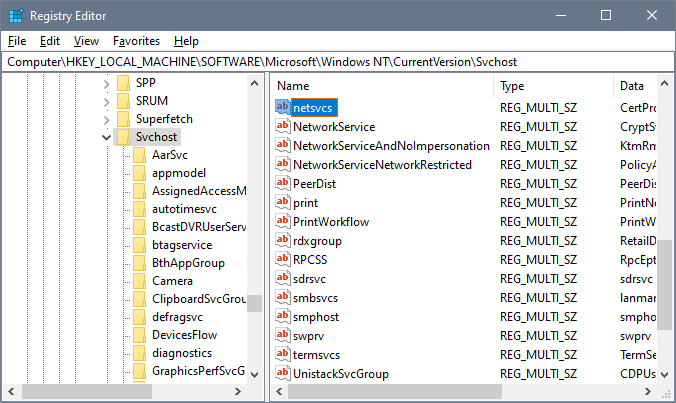
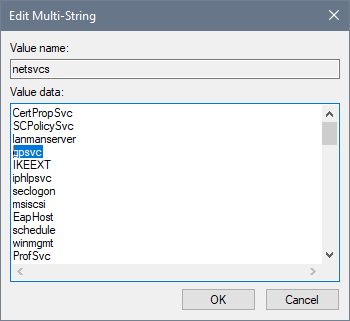
- Now, on the right, find the next line netsvcs and make double click on it.
- In the window that pop-ups check that the following line is there: gpsvc
Method #3: Disable Fast Startup on Windows 10
Fast startup is new functionality in Windows 10 that allows improving the system boot time, but this can affect the connectivity of the system services and have cause the Failed to connect to a windows service error.
So, you can try to disable it to fix the error, follow these steps:
- Open the Windows Search and type the word control
- There click on the results: Control Panel to open it.

- Now, click on the section Hardware and Sound and then on Power Options
- On the left side menu, click on the option: Choose what the power buttons do.

- Click on the option Change settings that are currently unavailable, and now you can uncheck the box: Turn on fast startup.

- Once you disable it, click on the Save changes button for the changes to take effect and restart your computer.
Method #4: Disable Windows Font Cache Service
Windows Font Cache Service is a service whose function is to improve the performance of the apps by copying the data from the most used sources into the cache, but this can create a conflict in the system, resulting in the Failed to connect to a windows service error.
So, you can try to disable it following these simple steps:
- Open the Run window using the keyboard shortcut: Win + R
- On the box, copy the following command:
services.msc - The Services window will open, there you need to find the Windows Font Cache Service line and right-click on it and select Stop
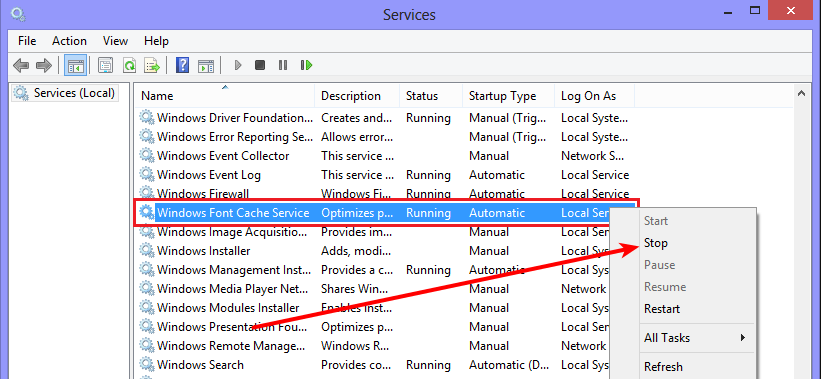
- Also locate the line: Windows Presentation Foundation Font Cache and stop it as well.
- Now, reopen the Run window using shortcut above and copy the following code in the box:
%localappdata% - On the folder that opens, find the Font Cache folder and remove it.
- Now go back to the Services window and Start the two services.
Method #5: Disable User Account Control (UAC)
In some cases, UAC prevents a service from connecting properly in Windows for reasons of extreme security, and although UAC plays a vital role in terms of system security, it can be the cause of the Failed to connect to a Windows service error.
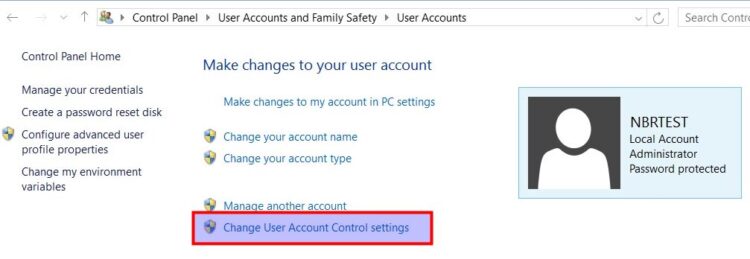
- You can check if UAC is the cause of the problem by disabling it, for that you need to open ControlPanel
- Once there, navigate to the section User Accounts and then to User Accounts
- There click on the line Change User Account Control Settings
- A new window will open, there slide the bar to the bottom to disable UAC.
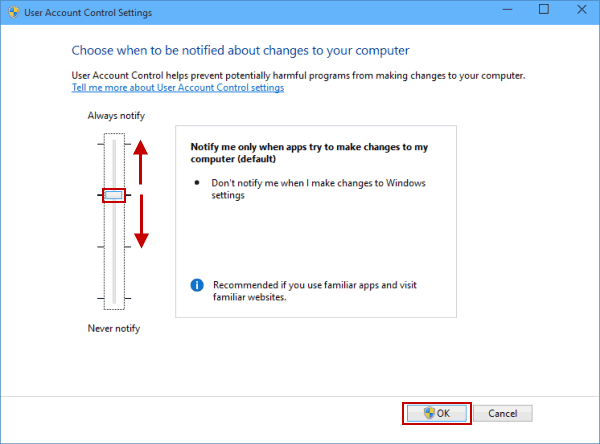
- Click on the OK button to save the changes and check if that fixes the error.
Method #6: Boot Windows in Safe Mode
Safe Mode is a useful feature that Windows has to boot the system when you have problems or errors on your system. There you can boot in safe mode when the Failed to connect to a Windows service error don’t let you even log in.
To boot in safe mode, follow these simple steps:
- Open the Start Menu
- Now click on the Power Button and while you press the Shift button, select the option Restart.
- Once the system is restarted, you will see the following:
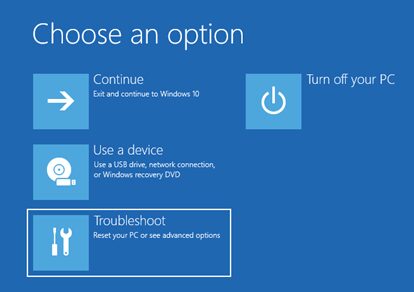
- Click on the menu Troubleshoot, and there you will see the following options:
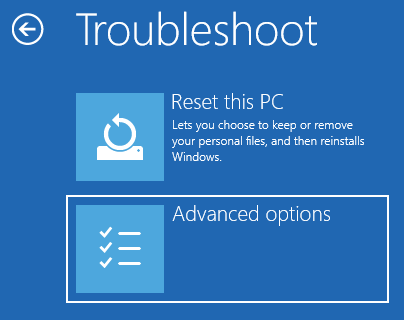
- There click on the option Advanced options
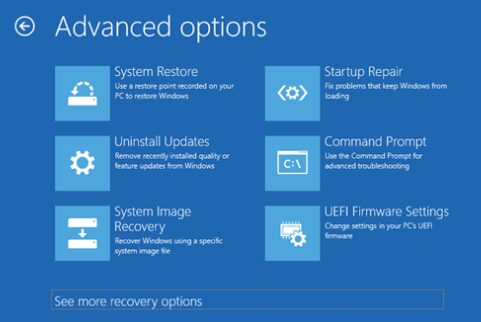
- In the bottom click on the option: See more recovery options
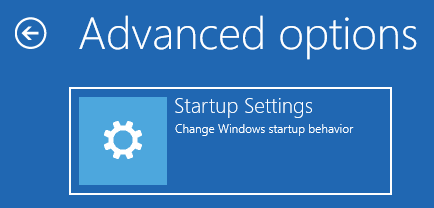
- Now, select the option Startup Settings, and you will see the following:
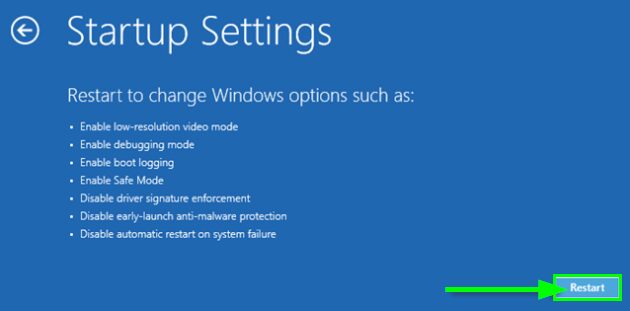
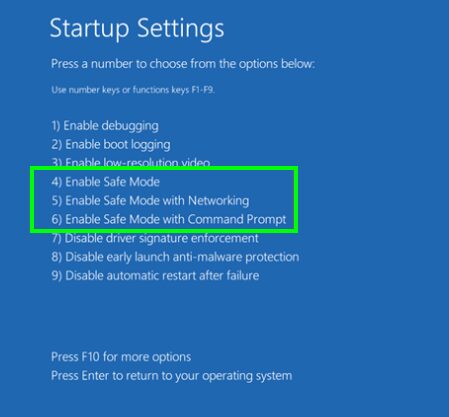
- There click on the Restart button, and then you will see several options to boot Windows. There you can use the F4, F5, or F6 options to boot in Safe Mode.
Wrapping Up: Failed to connect to a Windows Service
I have shown you several methods to fix this error, those are varied, and each one focuses on a different aspect of the system, but they are doubtful that they are a reliable source to fix this error and allow services to be connected as expected.
Must read: [Fix] Volume Mixer Won’t Open on Windows 10
I hope this tutorial helps you to fix the error quickly and if you have any question about this tutorial, let me know in the comments section, I will try to answer you the soonest I can. Thanks for reading.