How to fix the Google Chrome error “The webpage is not available” that comes with the code: DNS_PROBE_FINISHED_NXDOMAIN.
DNS servers are one of the essential elements in any network because it allows converting domain names into IP and vice-versa, which make easy the management and accessibility to standard users.
But like anything in the world, those servers also have some errors like the one that I see frequently: DNS_PROBE_FINISHED_NXDOMAIN. This error appears on Google Chrome when you have some wrong configuration in your DNS server. On the following lines, I will leave you some of the best ways to fix this problem and reaccess your favorite websites.
Restart DNS Client
The service “DNS Client” has the job to resolve and store in cache all the domain names enabled by default in the operating system; therefore, if you restart the service, the cache should be removed and refreshed, something that could fix this problem.
To perform that process, use the following key combination: Win + R. In the window that appears, copy the command services.msc and hit Enter.
The Services should open, there scroll down, and find the line DNS Client. Rightclick on that line and select the option Restart if is available.
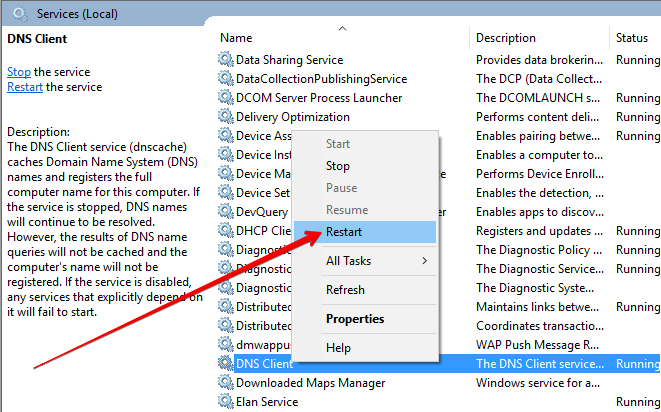
Note: The option to restart the services will be available only if there is something problem with the DNS.
Change DNS Server on Windows
Your DNS servers, by default, should be provided by your Internet Service Provider. Still, when those get overloaded, you may receive slow responses that affect your internet connection and end up showing the message: DNS_PROBE_FINISHED_NXDOMAIN.
An ideal solution to this problem consists of using other DNS servers, and you can try to do that following these steps:
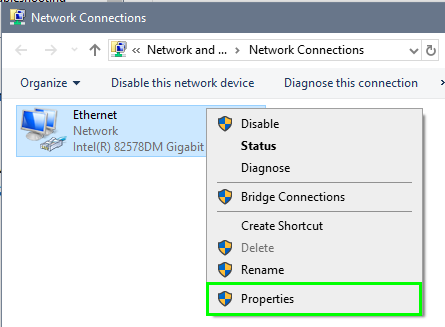
- First, open the Control Panel
- Navigate to the section Network and Internet and there click on “Network and Sharing Center.”
- Now, click on the option Change adapter settings located on the left menu.
- You should see a list of your available network devices. Rightclick on the one that you use to connect to the internet and select the option Properties.
- Double click on the option Internet Protocol Version 4
- Check the option User the following DNS server addresses
- Copy the following IPs: 8.8.8.8 and 8.8.4.4
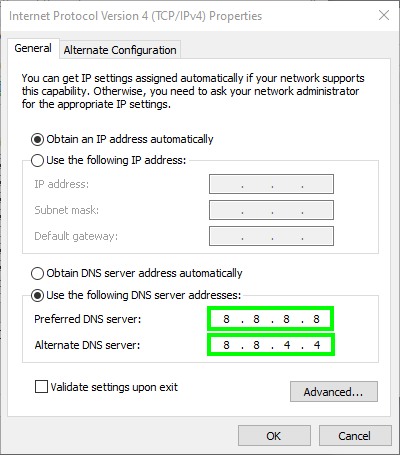
- Click on OK to apply the changes and close all the windows.
- Then try again to connect to the internet.
Release and Renew IP Address
When you visit a website, the IP address will be stored in the DNS cache to provide faster navigation the next time. When you revisit the website, the DNS server will first look for the IP address saved on your computer. If the cache has some outdated numbers, that will result in connectivity issues.
In this case, you can try to release and renew the IP address of your system.
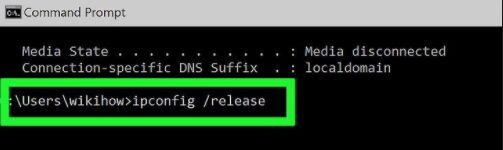
- Open a Command Prompt with Administrator Rights
- Copy the following command to release the IP:
ipconfig /release - Now run this command to clear the DNS cache:
ipconfig /flushdns - Finally run this command to renew your IP address:
ipconfig /renew
If you don’t have luck with the commands above, you can try this another one: netsh winsock reset.
Those are the methods that I try that could help you to fix this Chrome error. Remember that you can contact me for any further assistance.
Further reading: Fix api-ms-win-crt-runtime-l1-1-0.dll is missing on Windows 10