You want to boot your computer, but you see the blue screen of death: netio.sys? In this post, I will help you to troubleshoot this error in several ways.
What is Netio.sys? Well, this file is related to your network drivers, so when something wrong is happening with your network card or settings, you will see this BSOD on your computer.
Below I will leave, some of the methods that users have reported fixes this error and you will be able to use your computer without problems.
Method #1: System Restore
On these methods, I assume that you can boot your computer correctly, and you can use the utilities. If you cant access your computer, you need to follow the next methods where I show you how to create an installation media to be able to run commands.
Now, if you recently made some changes to your computer, there can be some conflict in your system that doesn’t Windows to work appropriately.
Fortunately, on Windows exist a useful feature that lets you roll back any action that you recently made on the system. His is name is System Restore, and you can use it following these methods:
- Open the Run window using the keyboard shortcut Win + R
- In the box, type the word
controland press Enter - Once in the Control Panel, click on the section System
- A new window will open and in the left side menu, click on System Protection
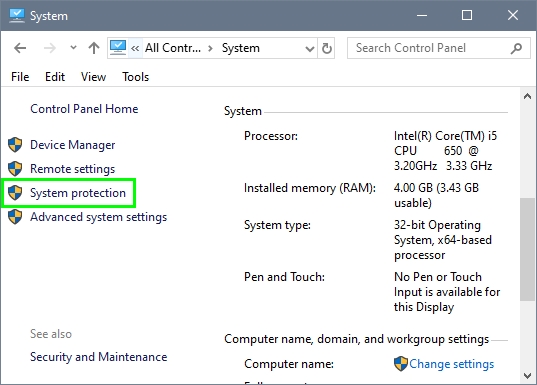
- On the window that opens, click on the button System Restore
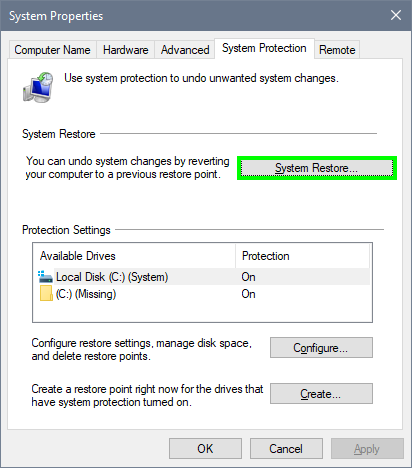
- Click on the Next button and choose some date before you made the changes
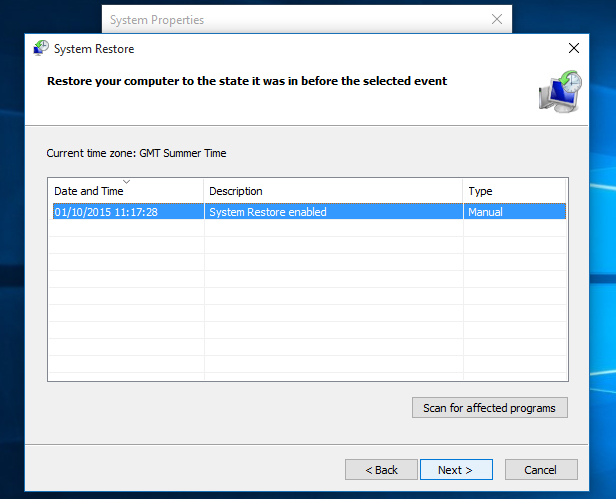
- Finally, click on Next and follow the wizard until the end to restore your system
Hopefully, when the process finishes, you will see no more the BSOD on your computer.
Method #2: Run SFC
If, after restoring your system, you still see the BSOD, you may need to check and repair your file system. On Windows, you have a useful utility that helps you to do that, SFC.
You can SFC from the Command Prompt with administrator rights, so if you can start your system, follow these steps:
- Open the Start Menu and search the word cmd
- Rightclick on the first results and in the menu click on Run as Administrator
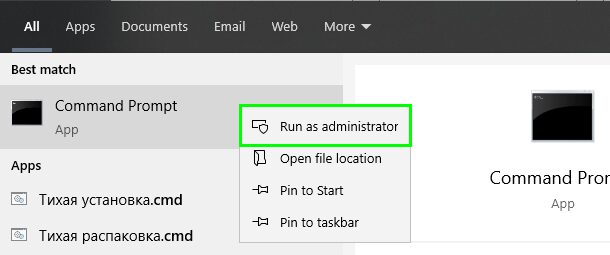
- Once in the Command Prompt, you will need to copy and run the following command:
sfc /scannow

- Now, you need to wait for SFC to scan your entire file system, it may take a while, when it finishes, restart your computer and the error will be fixed
Method #3: Run Check Disk
If the error persists after trying the methods above, you will need to use another utility that lets you scan your entire disk for any corrupted data. You can try to use this utility following these steps:
- Open the Run window using the keyboard shortcut Win + R
- In the box, type the command
cmdand press the keyboard shortcut Ctrl + Shift + Enter - Once in the Command Promot, type the following command and press Enter:
chkdsk c: /r
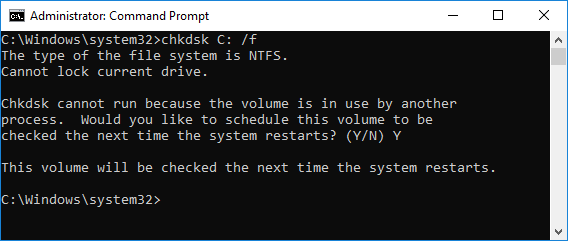
- When the utility finishes, restart your computer and, hopefully, the BSOD error will be fixed
Method #4: Scan Malware and Virus
When you see this error, there is a probability that some virus or malware have infected your computer.
If you haven’t scan your computer for the virus before, you might need to do it to remove these threads. To do this, you can use the built-in Windows Security antivirus of Windows 10.
If you don’t have Windows 10, you can download third-party tools; one of the ones I recommend is Malwarebytes.
To scan your computer on Windows 10, follow these steps:
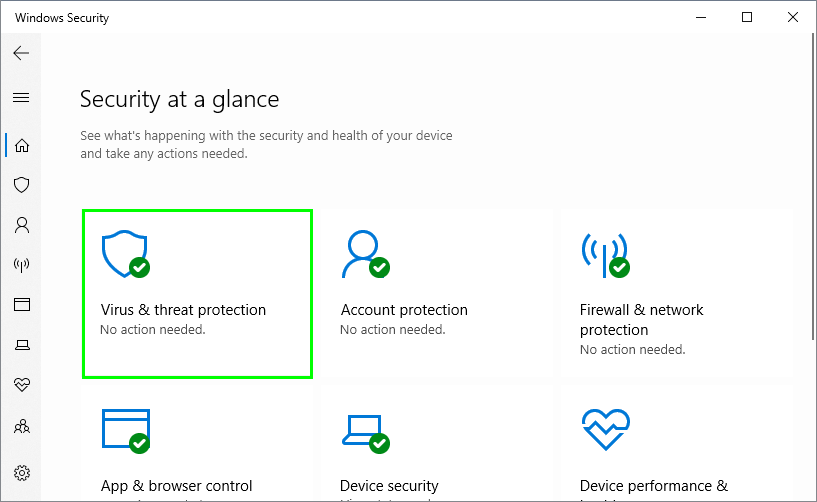
- Doubleclick on the Windows Security icon that you can find the taskbar at the right

- A new window will open and there click on Virus & threat settings
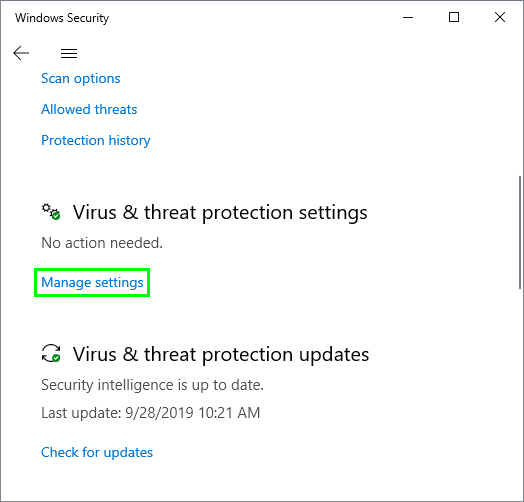
- Now click on Manage settings
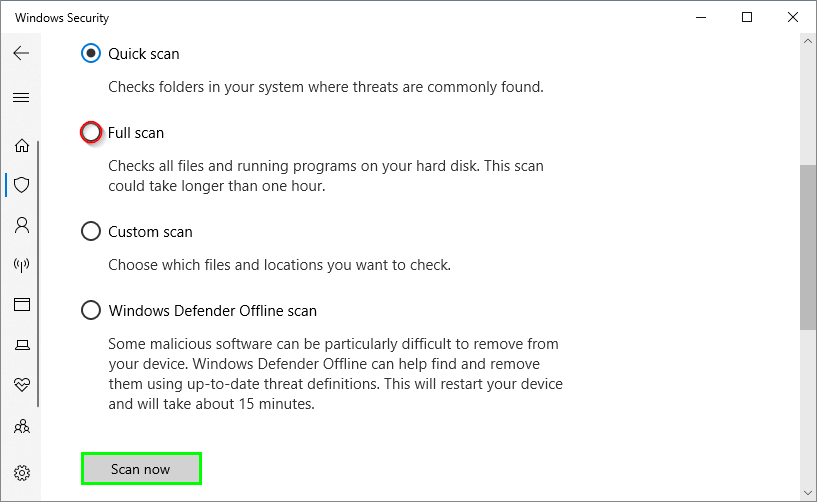
- Scroll down and check the option Full Scan and click on the button Scan Now
- Finally, you need to wait, this utility could take a long time to scan your entire, but surely it will remove any virus or malware
Method #5: Update Windows
If you want to keep your computer in good sating, you need to update it periodically. On Windows, you have a utility that does that job and is Windows Update.
So, to fix this error, you can try to download the latest updates following these steps.
On Windows 10
- Open the Start Menu and then click on the Settings button.
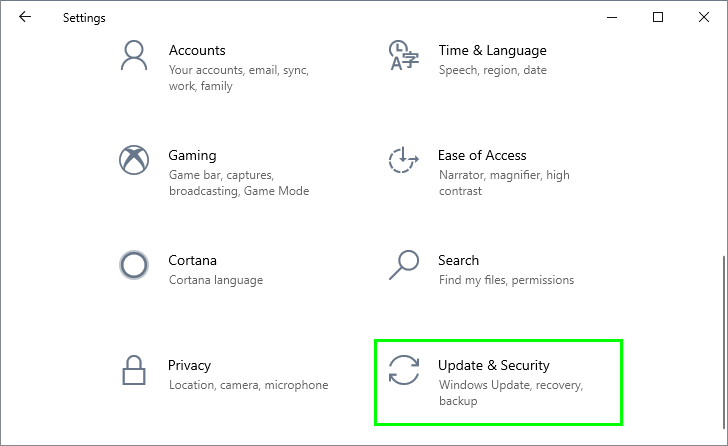
- Click on the section Update & Security.
- On the right, click on the button Check for updates.
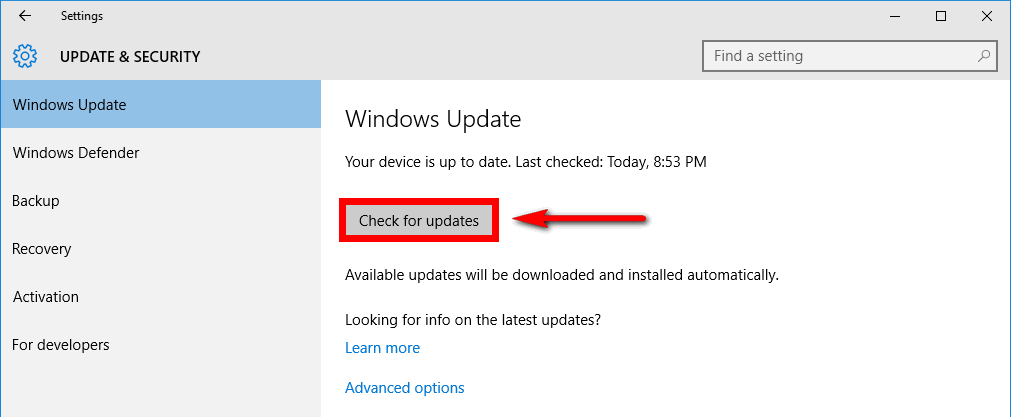
- Windows will search for any update available, and then you can install the ones you need. I recommend you to install all the updates available.
On Windows 7
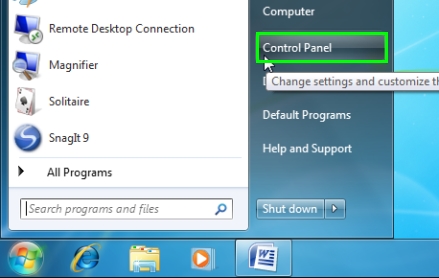
- Click on the Start Menu and then click on Control Panel.
- Once there, sort the view by large icons and then click on Windows Update.
- Now, there click on Search for updates and let the utility to start the process.
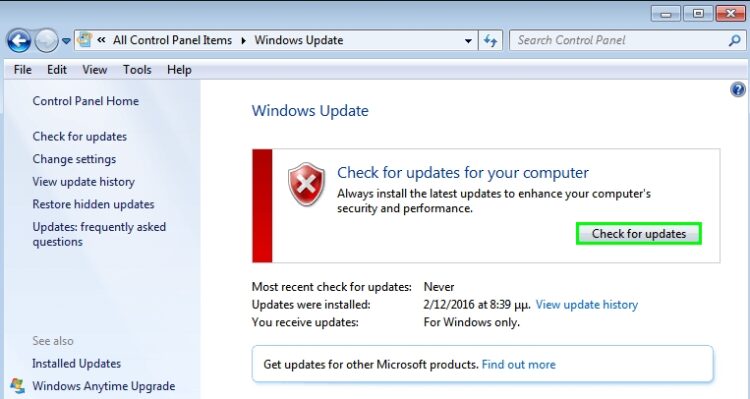
- Once it finishes, it will show you all the updates available, install them all even the optional ones
Method #6: Disable Network Device
Like I mentioned before, this error is, in some cases, related to your network adapter. You can verify if this is the problem by disabling your device temporarily.
You can do that from the Device Manager following these steps:
- Open the Run window using the keyboard shortcut Win + R.
- In the box, copy the command
devmgmt.mscand press Enter. - Once in the Device Manager, open the section Network adapters and there right-click on your device and in the menu click on Disable device.
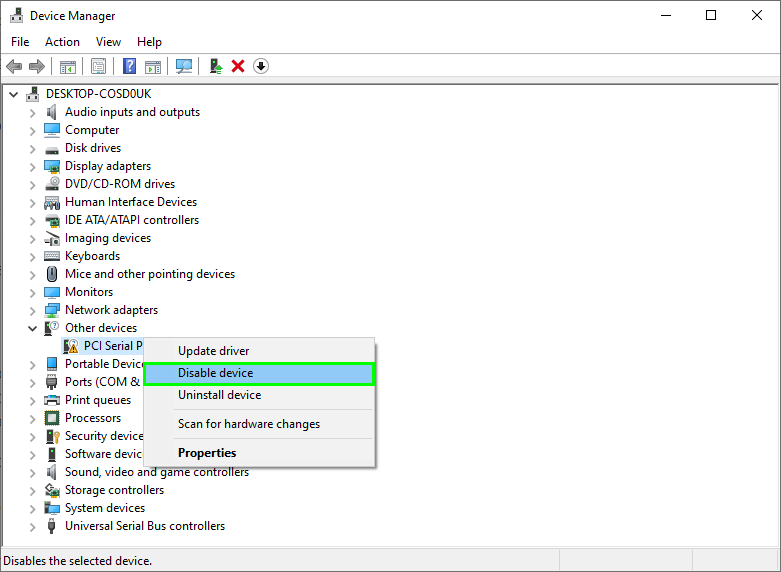
- Now, work with your computer, as usual, to verify if this device is the problem.
Method #7: Reset this PC
On Windows, you a new way to reset your computer. Now you have an option to keep your files while you reset all the settings. You can use this feature to try to fix this blue screen of death following these steps:
- Click on the Start Menu and there click on Settings.
- On the window that opens, click on the option Update & Security.

- Now, on the left side menu, click on Recovery.
- Then, on the right, click on the button Get Started.
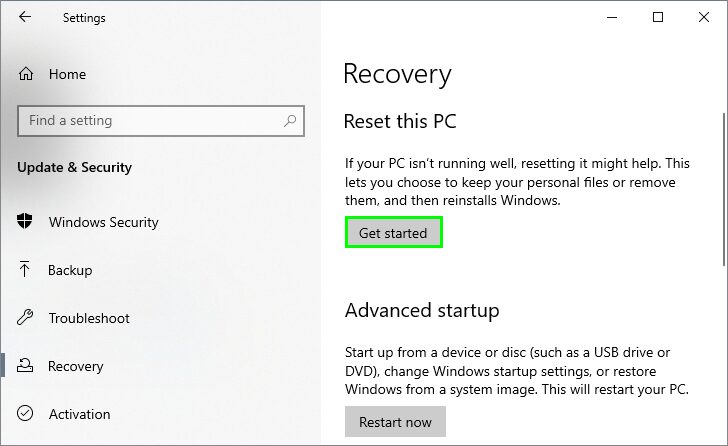
- A new window will appear, there click on Keep my files and follow the wizard until the end to reset your computer.
Method #8: Repair Windows using Installation Media
When you can’t boot to your computer, you can’t use any of the methods I show you until now. In that case, you will need to use your Windows DVD to repair your computer.
If you don’t have a Windows DVD, you can create an installation media on a USB. Here you have a thoughtful guide about how to create a recovery USB drive.
- Insert your DVD or USB disk on your computer and restart it.
- Now, open the boot selector with the keys F8 or F9 (depending on your motherboard).
- Once the Windows Install boots, choose your language and then click on Next.
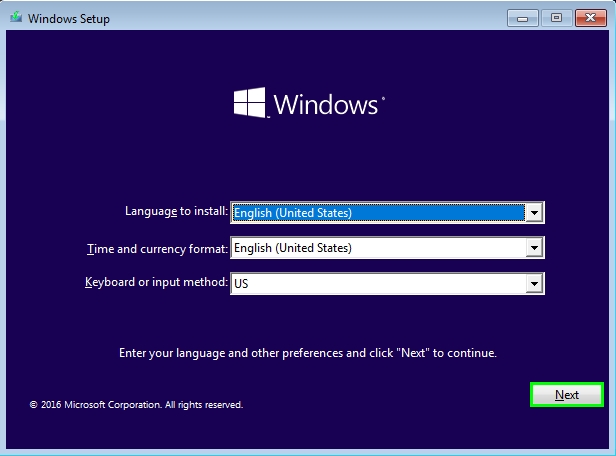
- Then, click on the button, Repair your computer.
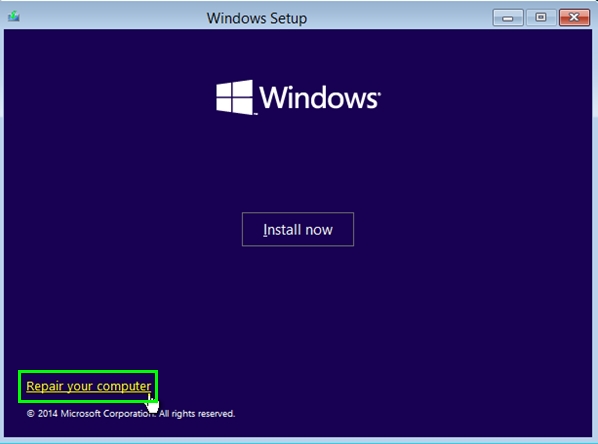
- There you will have several options to repair your PC, and I recommend you to use the Automatic Startup Repair.
Wrapping Up
So far, those are the best methods that could help you to fix this error on Windows, but remember to be careful while you follow them.
If you haven’t been able to fix the error, you may need to ask for technical support. Thanks for reading, don’t forget to share this post on your social networks.

