One of the most common issues is when you have a problem to eject your external hard drive on Windows 10.
An error window appears when you want to eject the external hard drive and that why I’m going to show you some of the easiest ways to fix this issue.
I always recommend you when you want to eject your external hard drive to use the feature “Safely Remove Hardware and Eject Media” to avoid file corruption although it doesn’t work in all the cases.
The consequences of ejecting an external hard drive by unplugging it manually could be varied. Maybe nothing happens in the beginning but in the worst cases, your drive could lose information. To avoid that consequence, you can follow these methods to fix the error when your external hard drive won’t eject but if you already lose some important information you can always learn how to recover deleted files from hard drive.
Close Programs using your External HDD
Before trying to force the eject on your external hard drive, there are some things that you need to verify.
If you recently have been editing files inside your external hard drive, maybe there are some applications that you haven’t closed correctly even if you don’t see them.
To verify that your external hard drive could be safely be ejected, you need to follow these steps:
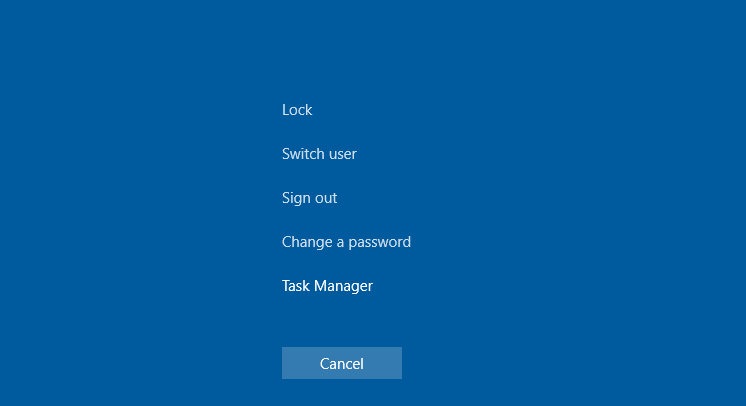
- First, you need to press the keys Ctrl + Shift + Esc to open the Task Manager. If you like another way, you can right-click in the Taskbar and open it from there.
- Once opened, you need to click on the button More details to see all the apps and processes running in the background.
- There you need to locate the app that you have been using before to edit your files. Select it and click on the button End Task
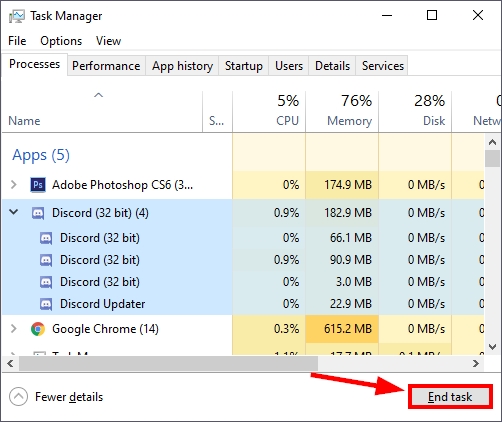
- This will close the application properly and now you can try to safely remove your external hard drive
Run Troubleshooter
If you can eject your external drive using the previous method, you can try the troubleshooter on Windows 10.
- In the Taskbar, click once in the Safely Remove Hardware and Eject Media icon
- A small menu will appear, there click on Open Devices and Printers
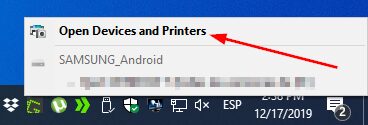
- In the Devices and Printers window, you need to locate your external hard drive under the section Devices
- Rightclick on it and select the option Troubleshoot
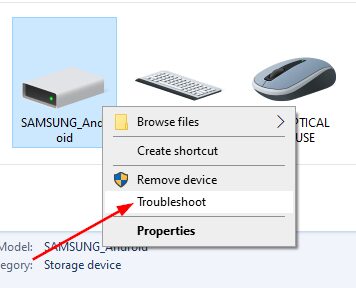
- The utility will start automatically to find problems with the device and fix them. When it finishes, you can try again to eject the external hard drive.
Eject External Hard Drive using Device Manager
This option is recommended when you have connected an external hard drive that doesn’t have any software installed on your computer that manages his settings.
On this method, we are going to uninstall the device to eject the external hard drive.
- On Windows 10 you need to right-click on the Start Menu to open a special menu. There click on the option Device Manager
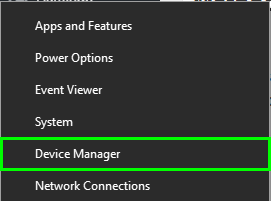
- This will open a window where you can see all the devices installed on your computer.
- There you need to navigate to the section Disk drives and find your external hard drive. Note: Be careful to not choose your internal HDD.
- Once you find it, right-click on it and select the option Uninstall device
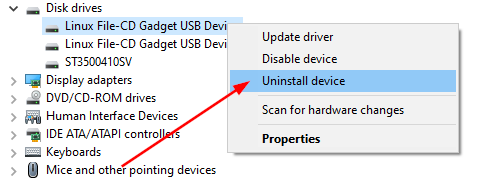
- Now you can see that your external hard drive has been ejected correctly. The next time you connect it again, Windows will automatically install the device
Sign Out
The last method that you can try on Windows 10 is to sign out.
When you sign out, Windows 10 will close all the apps, programs, services, processes and will also eject any device that you have connected.
This method could help you to safely eject your external hard drive to avoid data loss.
To sign out on Windows 10, press the keys Ctrl + Alt + Del at the same time and choose the option Sign out.
That’s it, then you can try to see that your external hard drive has been ejected successfully. If you want to be really sure that your external device has been ejected, you can shut down the PC.
I hope this tutorial helps you. Let me know in the comments, which method works for your computer? Do you have suffered data loss after trying those steps?

