Do you want to hide the System Reserved partition? On this post, I will show you two to do this easily on Windows 10.
Automatically hardware developers for the various operating systems create a particular partition of approximately 500 MB intended for system recovery, and this has been added there so that at the time it is necessary to recover the operating system for some error, double click on that partition and from there follow the steps of the wizard:
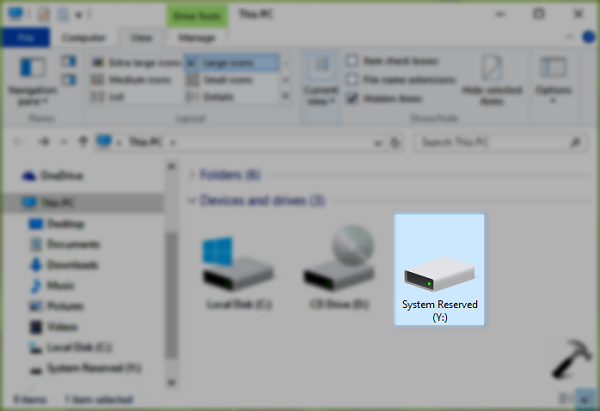
Although it is a unit created automatically for the system, in some situations it may be ideal for hiding it to avoid accidentally accessing it and thus corrupt something in the optimal operation of the operating system.
So, let’s see how to this partition from the File Explorer in two easy ways.
#1:Hide System Reserver Partition using Disk Management
Disk management is the graphical way that Windows provides you to manage everything related to the units that you connect to your computer. So, on this method, we will be using this tool to hide the partition:
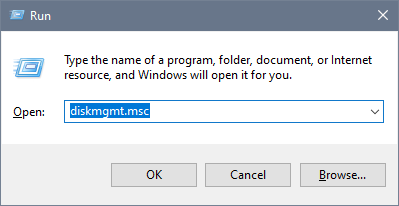
- Open the Run window using the keyboard shortcut: Win + R
- On the blank box type the command
diskmgmt.mscand press Enter
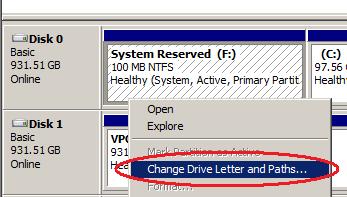
- Once the Disk Management is opened, find the System Reserved partition and right-click on it, then in the menu select Change Drive Letter and Paths
- On the window that opens, select the letter assigned and click on the button Remove

- Then, click on the Yes to all the warnings about the system partition.
- Finally, the drive will be hidden and will not be longer accessible from the File Explorer.
#2: Hide System Reserved Partition using Diskpart
Diskpart is the command-line tool offered by Windows for the management of the hard drives that you connect to your computer. It is like the command alternative for Disk Management.
To hide the partition using this command, follow these steps:
- Open the Start Menu and type the word: cmd
- Rightclick on the first results and in the menu select Run as Administrator
- Once in the Command Prompt, run the following command:
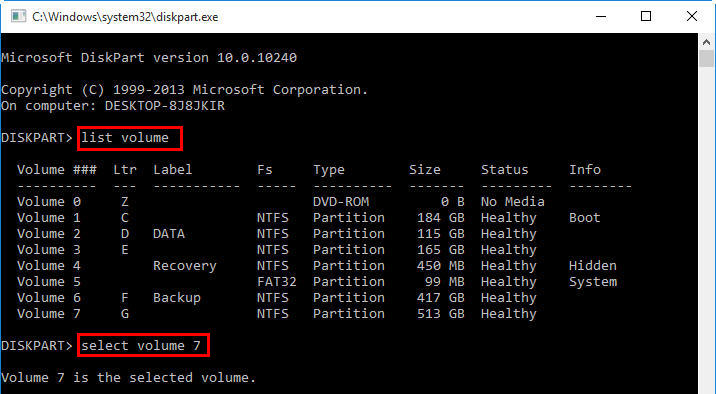
diskpart - Once inside the diskpart tool, run the following command:
list volume - There you will a list of all your available partition, there you need to take note of letter and volume number of the System Reserved partition
- Now, select the volume using the following command:
select volume #
- Finally, to remove the letter assigned to the partition, run the following command: remove letter=A

Wrapping Up
Although the System Reserved partition is a useful tool that will help you recover your system when some problem happens, it would be better if you hide that partition from the File Explorer.
Must read: How To Show Folder Size in Windows 10
With one of the mentioned methods, you can effectively hide this partition in Windows 10. If you know another to do this, let me know in the comment section.