Do you see the error Failed to play a test tone? Well, on this post I will show you how to fix this annoying error on Windows.
Some time ago, Microsoft released the latest version of its operating system, and many millions of users have already upgraded to Windows 10.
During this time, I have seen how with each update, some users have reported multiple problems in the system that appears randomly on some computers without knowing very well the cause.
Some of the most frequent are to see how your PC occasionally restarts for no apparent reason or how soon you see the Failed to play a test tone warning and the sound stopped working.
Focusing on this last problem, I will show below some tips to fix this error on your Windows 10.
Method #0: Restart Audio Service
When you face this ‘Failed to play test tone’ issue on Windows 10, a quick way to fix the problem is by restarting the Windows Audio service.
To restart these services, you can follow these easy steps:
- Press the keys Win + R and in the text box copy the command
services.msc - Now, hit Enter to open the Services window. There scroll down until you find the Windows Audio Service
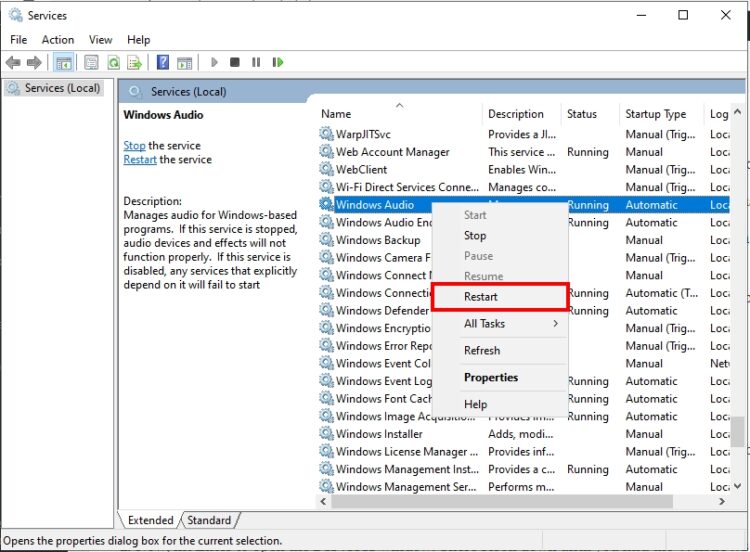
- Right-click on it and in the menu select the option Restart
- Wait until the service gets restarted and then try once again to play the test tone.
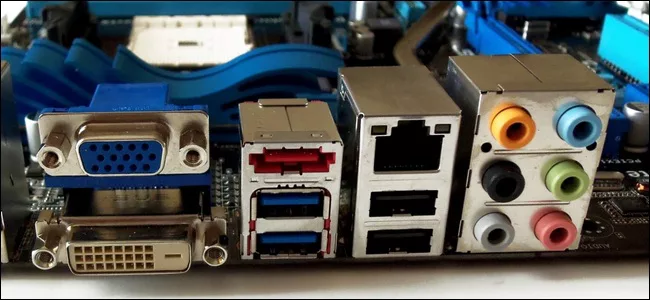
Method #1: Check your Connections
Although it is somewhat obvious, it is first of all advisable to check the connections of your cables to verify that all of them are correct and rule out that the problem Failed to play test tone isn’t because of a bad sound card or speakers connection.
Method #2: Mute Sound
The next step, although it is also quite evident, is to verify that you have not muted the audio of your computer without realizing it.
Sometimes when you try to start the test tone, Windows can see that you have mute your sound.
To enable your sound, you must right-click on the speaker icon found in the Windows 10 taskbar and open the Open Volume Mixer option.
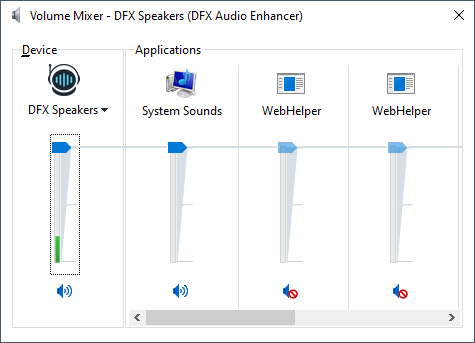
Once there, you will have to check that the speaker volume isn’t turned off or in mute mode.
Method #3: Check Audio Drivers
System updates can cause specific drivers to be uninstalled. Hence the next thing you need to do is check if the audio drivers are reporting an error.
In any case, it is advisable to reinstall the audio drives in your computer. To do that follow these simple steps:
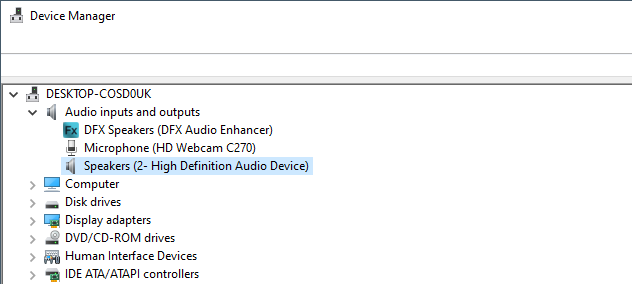
- Rightclick on the Start Menu and select the option: Device Manager
- Once there open the section Audio inputs and outputs
- Right-click on Speakers and choose the options Uninstall or Update
Method #4: Update High Definition Audio CODEC Driver
Some computers may encounter problems in their IDT High Definition Audio CODEC that you can solve by manually updating their driver and therefore fixing the error Failed to play test tone.
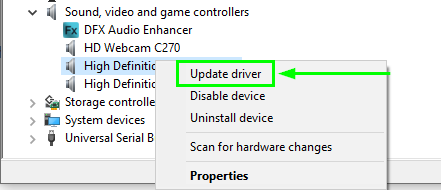
To do this, you must right-click on the Start menu and select the option Device Manager.
Once there, open the section Sound and video controllers and game controllers and right-click on High Definition Audio Device, finally select the option Update driver.
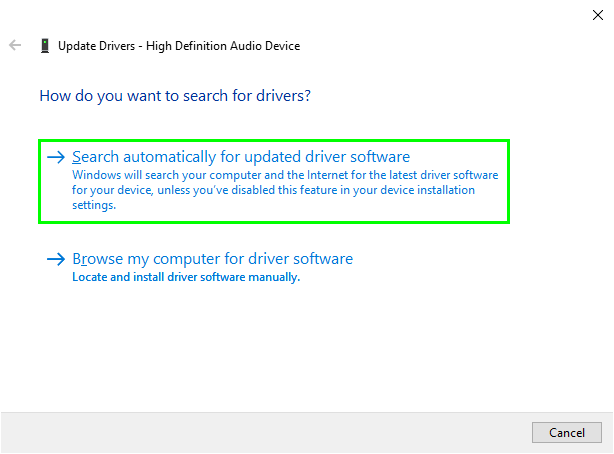
On the window that opens, you only need to choose the option Search automatically for updated driver software and wait for Windows to install the drivers.
Method #5: Set Default Device
If you try to connect to an audio device via USB or HDMI, you may have to set this device as the default to troubleshoot the error Failed to play a test tone.
To do this, follow these simple steps:
- Open the Control Panel
- Navigate to Hardware and Sound > Sound
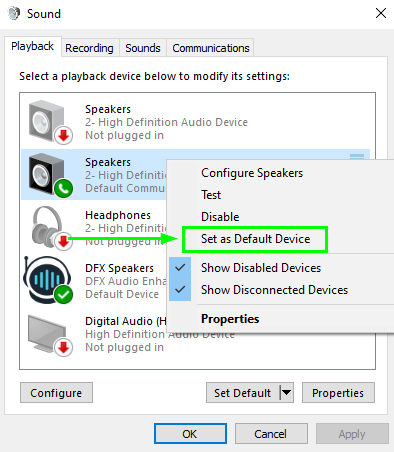
- On the window that opens, find your new connected device and right-click on it.
- Finally, choose the option Set as Default Device.
Method #6: Run Troubleshooter
Microsoft has a tool called Audio Troubleshooter that allows you to perform an audio system check to detect any problem; that tool can help you to fix the error Failed to play test tone.
http://aka.ms/diag_cssemerg69319
This troubleshooter can be downloaded from this link: Audio Troubleshooter.
Once you download the file, just run it and start the process clicking on NEXT. You only need to wait for the tool to start troubleshooting your computer.
Method #7: Disable Audio Enhancements
Audio Enhancements are a useful feature that Windows has to improve the sound of your system. But when you have an error like Failed to play a test tone, you may need to disable it. To do this, follow these simple steps:
- Open Control Panel
- Navigate to Hardware and Sound > Sound
- Once on the Sound window, right-click on your default device and select Properties.
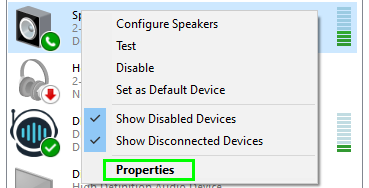
- Now, navigate to the Enhancements tab and disable all the enhancements.
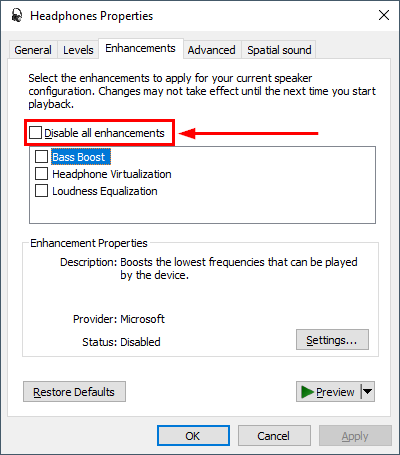
- Now try the sound again to see if the problem has gone.
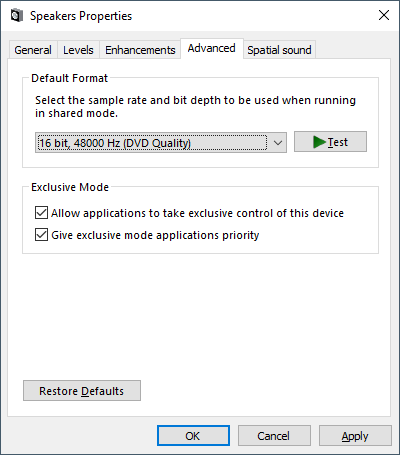
Method #8: Try Different Formats
At last option, you can try different formats to see if that fixes the error. To do that, follow these steps:
- Open Control Panel
- Navigate to Hardware and Sound > Sound
- Now, go to the tab Playback, right-click on your default device and select Properties.
- Once there, in the Advanced tab, go to Default Format and change the settings and try the one that works for you.
Method #0: Restart Audio Service
When you face this ‘Failed to play test tone’ issue on Windows 10, a quick way to fix the problem is by restarting the Windows Audio service.
To restart these services, you can follow these easy steps:
- Press the keys Win + R and in the text box copy the command services.msc
- Now, hit Enter to open the Service window. There scroll down until you find the Windows Audio Service
- Right-click on it and in the menu select the option Restart
- Wait until the service gets restarted and then try once again to play the test tone.
Method #9: Disable Exclusive Mode
This error could appear on Windows 10 when you have enabled the option that allows apps to take exclusive control of your speakers or headphones.
You need to disable this option from the Sound settings following these steps:
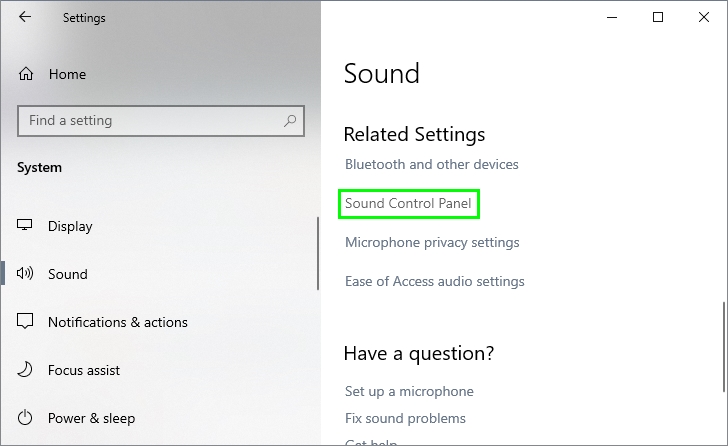
- First, navigate to your Windows Taskbar and right-click on the speaker icon. In the menu that opens, click on the option Open Sound settings
- You will open the Settings utility, there scroll down and click on the line Sound Control Panel under the section Related Settings
- Now, in the Sound Control Panel, right-click on your speakers or headphones and select the option Properties
- In the Properties window, navigate to the Advanced tab and there uncheck the box Allow applications to take exclusive control of this device
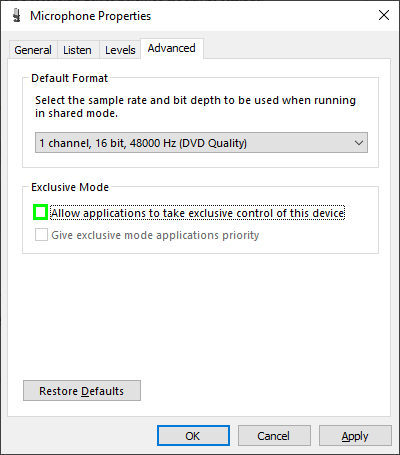
- Finally, once again, try to play the test tone to verify that the issue has been fixed
Method #10: Run SFC
If you haven’t been able to fix the test tone issue so far, you may need to verify that your system files are not corrupted. One quick way to do this is by running the built-in System File Checker or SFC, and you can do that following these steps:
- We are going to run this command using the new PowerShell. Rightclick on the Start Menu and there click on the option Windows PowerShell (Admin)
- Once opened the PowerShell, you need to copy the following command:
sfc /scannow

- The utility will start scanning your computer for any problem, and it will repair automatically
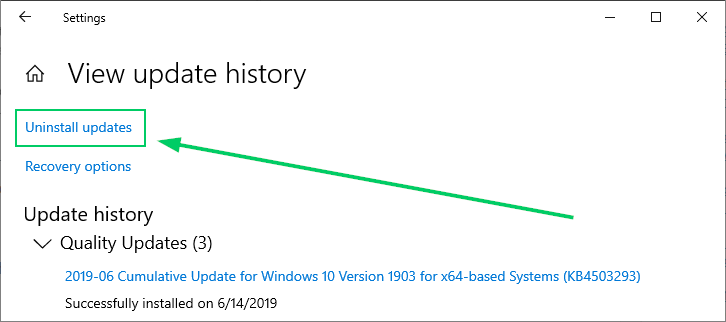
Method #11: Remove Recent Update
Sometimes these problems with the audio device can be fixed by removing the recently installed updates on your computer.
You first need to verify that you have installed recently any update that could be conflicting and to do that follow these steps:
- First, you will need to open the Settings utility pressing the keys Win + I
- There, scroll down and click on Update & Security
- You will open the Windows Update window, there scroll down and click on the button View update history and there click on the button Uninstall updates
- Now you will open the Programs and Features window, there select the last update and click on the button Uninstall
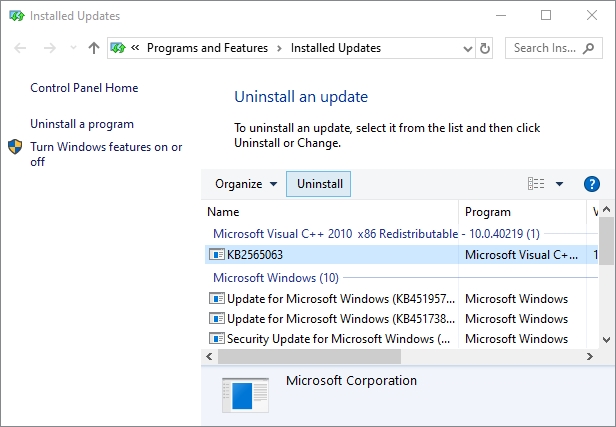
- Once you uninstalled the update try to play the test tone again to verify that the issue has been fixed
Method #12: Disconnect USB Devices
This will be my last advice for you if you haven’t been to fix the problem with the test tone. Sometimes when you have connected some USB devices like your webcam or external hard drive, they create some conflicts with your speakers or headphones.
But why this happens? Well, the webcams devices also integrated some microphones and in some cases, even have some builtin speakers that could be conflicting with your headphones or speakers.
Therefore a quick way to fix this issue is by disconnecting all your USB devices minus the keyboard and mouse.
Wrapping Up: Failed To Play Test Tone
The error Failed to Play Test Tone can be annoying when you don’t know how to fix it. Hopefully, with any of the methods I mentioned above, you can quickly fix this error and enjoy your multimedia content again.
Thanks for reading, if you have any question about this tutorial, let me know in the comments section.
Must read: